Member newsletter guide
Easily communicate with your member using our super-simple email newsletter feature, and optionally publish the same content to your Memberful-hosted site — all in one click.
In this setup guide, we'll walk you through the steps to create a member newsletter using Memberful. You'll learn how to create a newsletter post, send it to your members, and track its performance.
How to build a member newsletter
- Sign up for Memberful.
- (Optional) Allow free registration.
- Create your plans.
- Create your subscribe page.
- (Optional) Add paid plan purchase links to your newsletter or website.
- Create a members-only post.
- Send your members-only newsletter.
- (Optional) Send a preview of your members-only newsletter.
- Test the member experience.
- (Optional) Track sent post metrics.
- Go live.
Sign up for Memberful
To get started, sign up for Memberful, which is free while you're in test mode.
(Optional) Allow free registration
Want to offer free registration to your newsletter? Our free registration feature enables your members to sign up without any cost or obligation for a paid subscription.
To enable this feature, navigate to Website → Free registration, and toggle on Allow free registration. From there, you can edit the title, subtitle, or the button text of the form and click Save.

Learn more about allowing free registration.
Create your plans
Navigate to Revenue → All Plans and click New plan. Fill in the details and settings for your plan and click Create Plan.

Learn more about creating membership plans.
Thinking of selling multiple plans that members can move between? Enable our upgrade/downgrade settings.
Create your subscribe page
To sell memberships to your audience, you can create a customized subscription page hosted by Memberful by navigating to Website → Subscribe.
Add a title and description to the page, then select which options appear on the page — whether they're paid plans, standalone downloads, or free member registration. Customize their names and descriptions, and add other content such as FAQs or testimonials. Check out this example for inspiration.

Learn more about creating a custom subscribe page.
(Optional) Add paid plan purchase links to your newsletter or website
Copy the purchase link from the plan settings page in your Memberful dashboard and paste it on your newsletter or website.

Learn more about adding purchase links to your newsletter or site.
Create a members-only post
Posts can be used to share exclusive, dynamic content with your members. Think of a newsletter or blog post with embedded videos and beautiful visuals. To create a newsletter post, navigate to Content → Posts and click Create a post.

Add a title and content for your post. Use the icons at the top of the content editor to format your content and add elements like links and images.

Click Preview to see a preview of what this post will look like to your members.

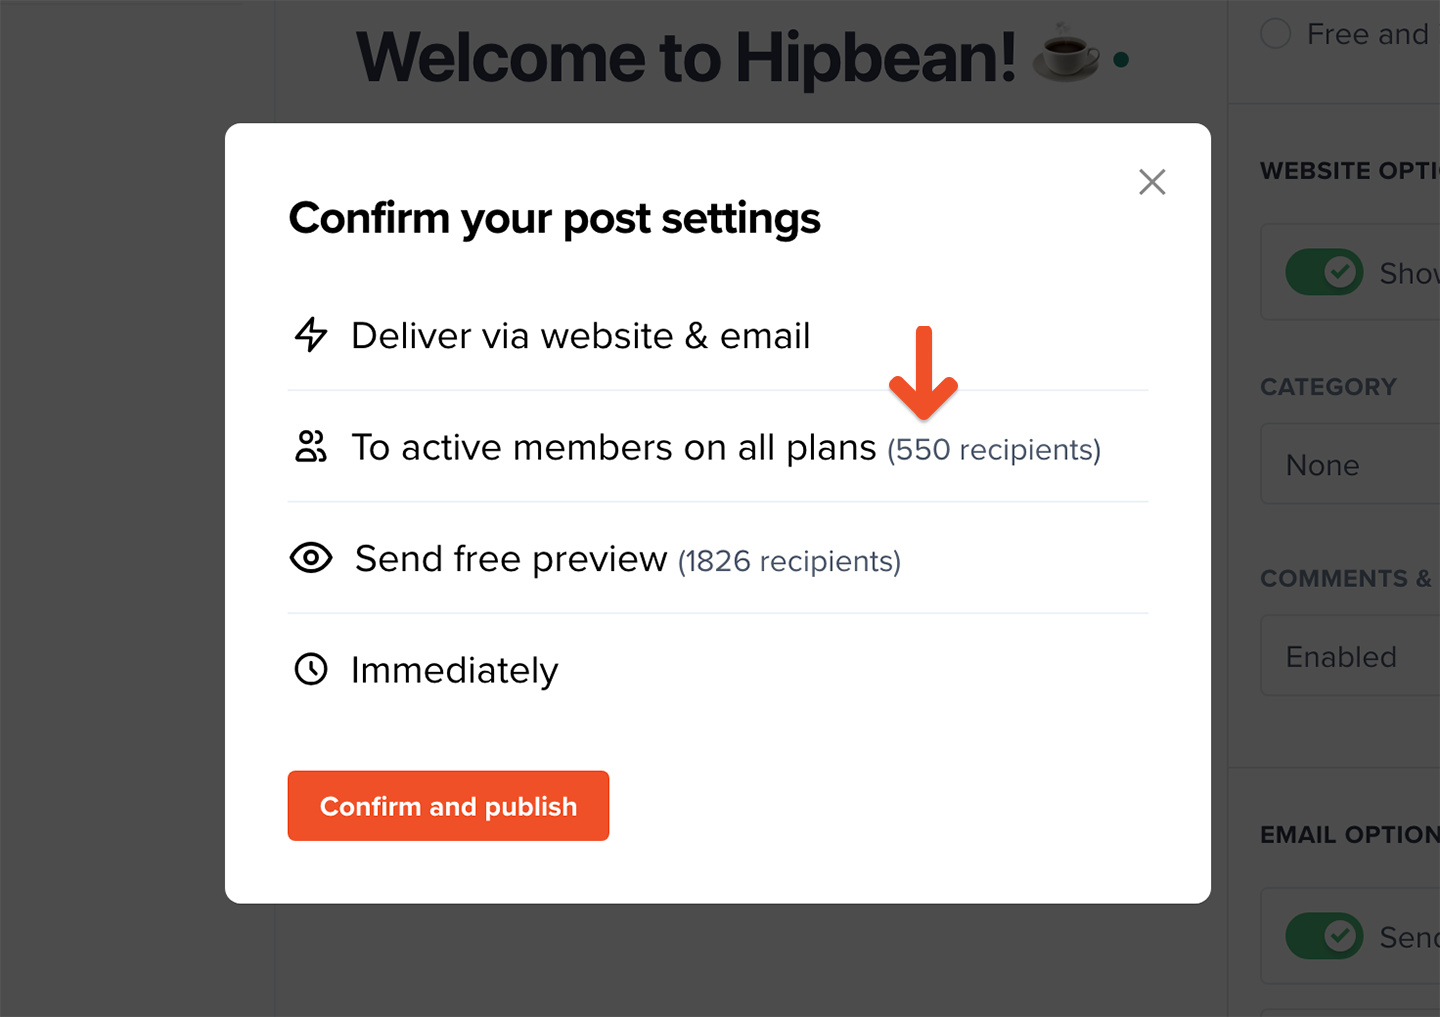
Select an audience to target
Your posts can be sent out to All members (including free members), or send a targeted newsletter to Active members on all plans, Active members on select plans, or Free and inactive members.

When you choose to target only members of selected plans, you can select which plans should be included.

All-access pass holders are included in the count of how many members will receive a message, so the number of recipients might be different than the number of subscribers in the selected plans.
(Optional) Schedule the post
You can schedule your post to be published or sent sometime in the future. To do so, click Schedule to publish in the future and enter a date and time.

Customize your branding
Click the paintbrush icon in the Website tab to customize the background and button colors, and upload your logo.

Additionally, you can see which features are customizable, how they interact, and what they’ll look like to your members across different views and devices.
These customizations will be applied to your newsletter messages and published posts.


Learn more about customizing your branding.
Send your members-only newsletter
Click Save draft if you're not ready to publish your post but would like to save your work.

Before you publish the post, click Send test email to see a preview of what your members will see in their inbox.

Click Publish once you're ready to send it.

Replies from members will be forwarded to the account owner's email address.
You can send up to 10 emails per day. Posts cannot be sent via email or scheduled while in test mode. Connect to Stripe to enable that. If you need to send more than ten emails per day, contact us to discuss your use case and how we might support it.
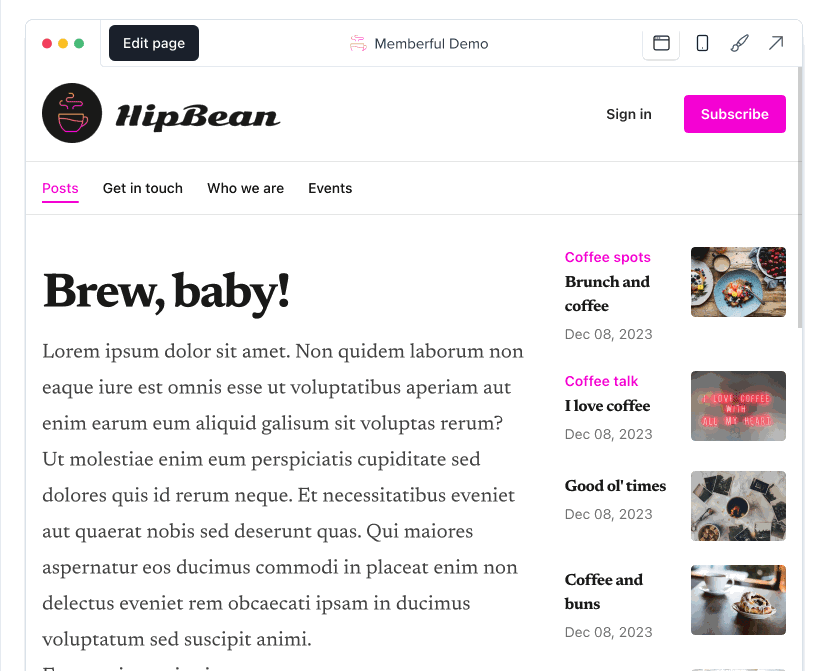
(Optional) Publish messages to a Memberful-hosted website
Our posts feature is two features in one. It allows you to:
- Send posts via email — allowing you to send out a members-only newsletter.
- Publish posts to a Memberful-hosted website — allowing you to offer members-only content on a simple website that's automatically created and hosted for you by Memberful.
You can choose to deliver your posts via email, website, or both.
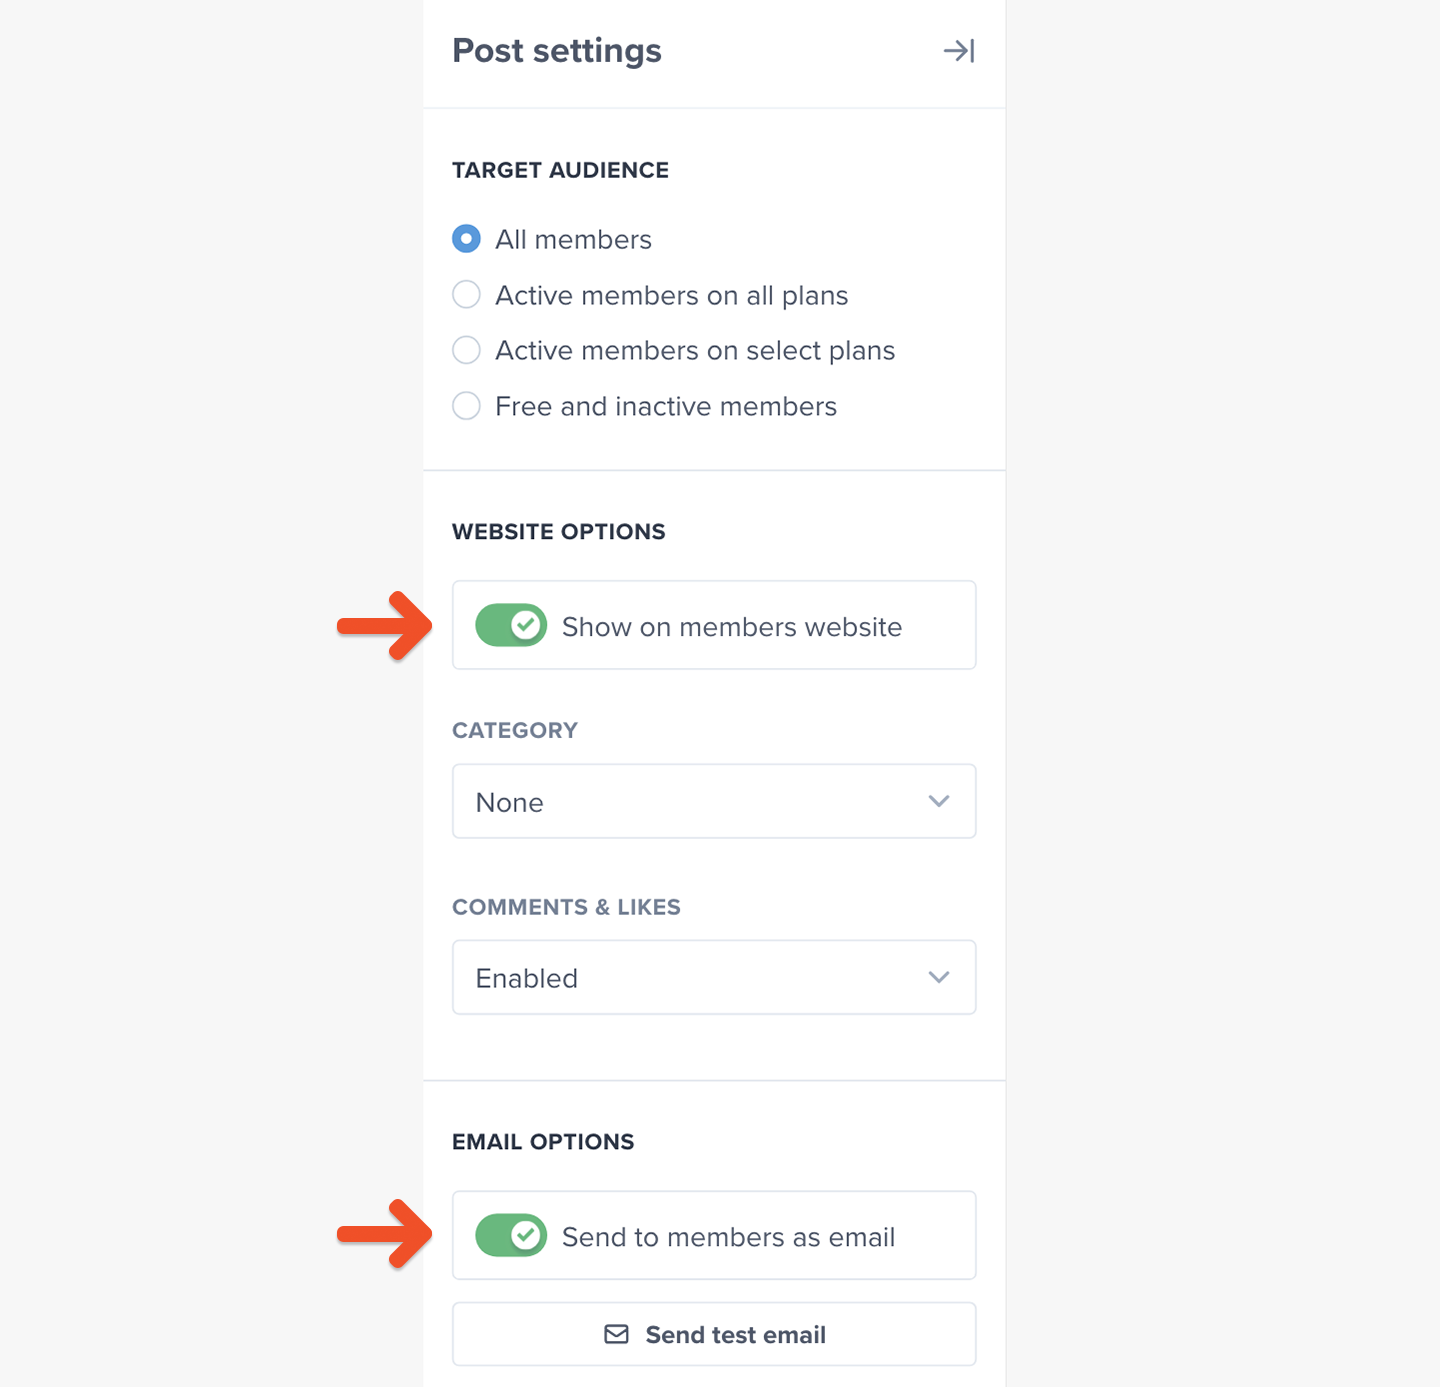
To publish your newsletter message to your Memberful-hosted website, enable the Show on member website toggle. Check out this example of a published post.
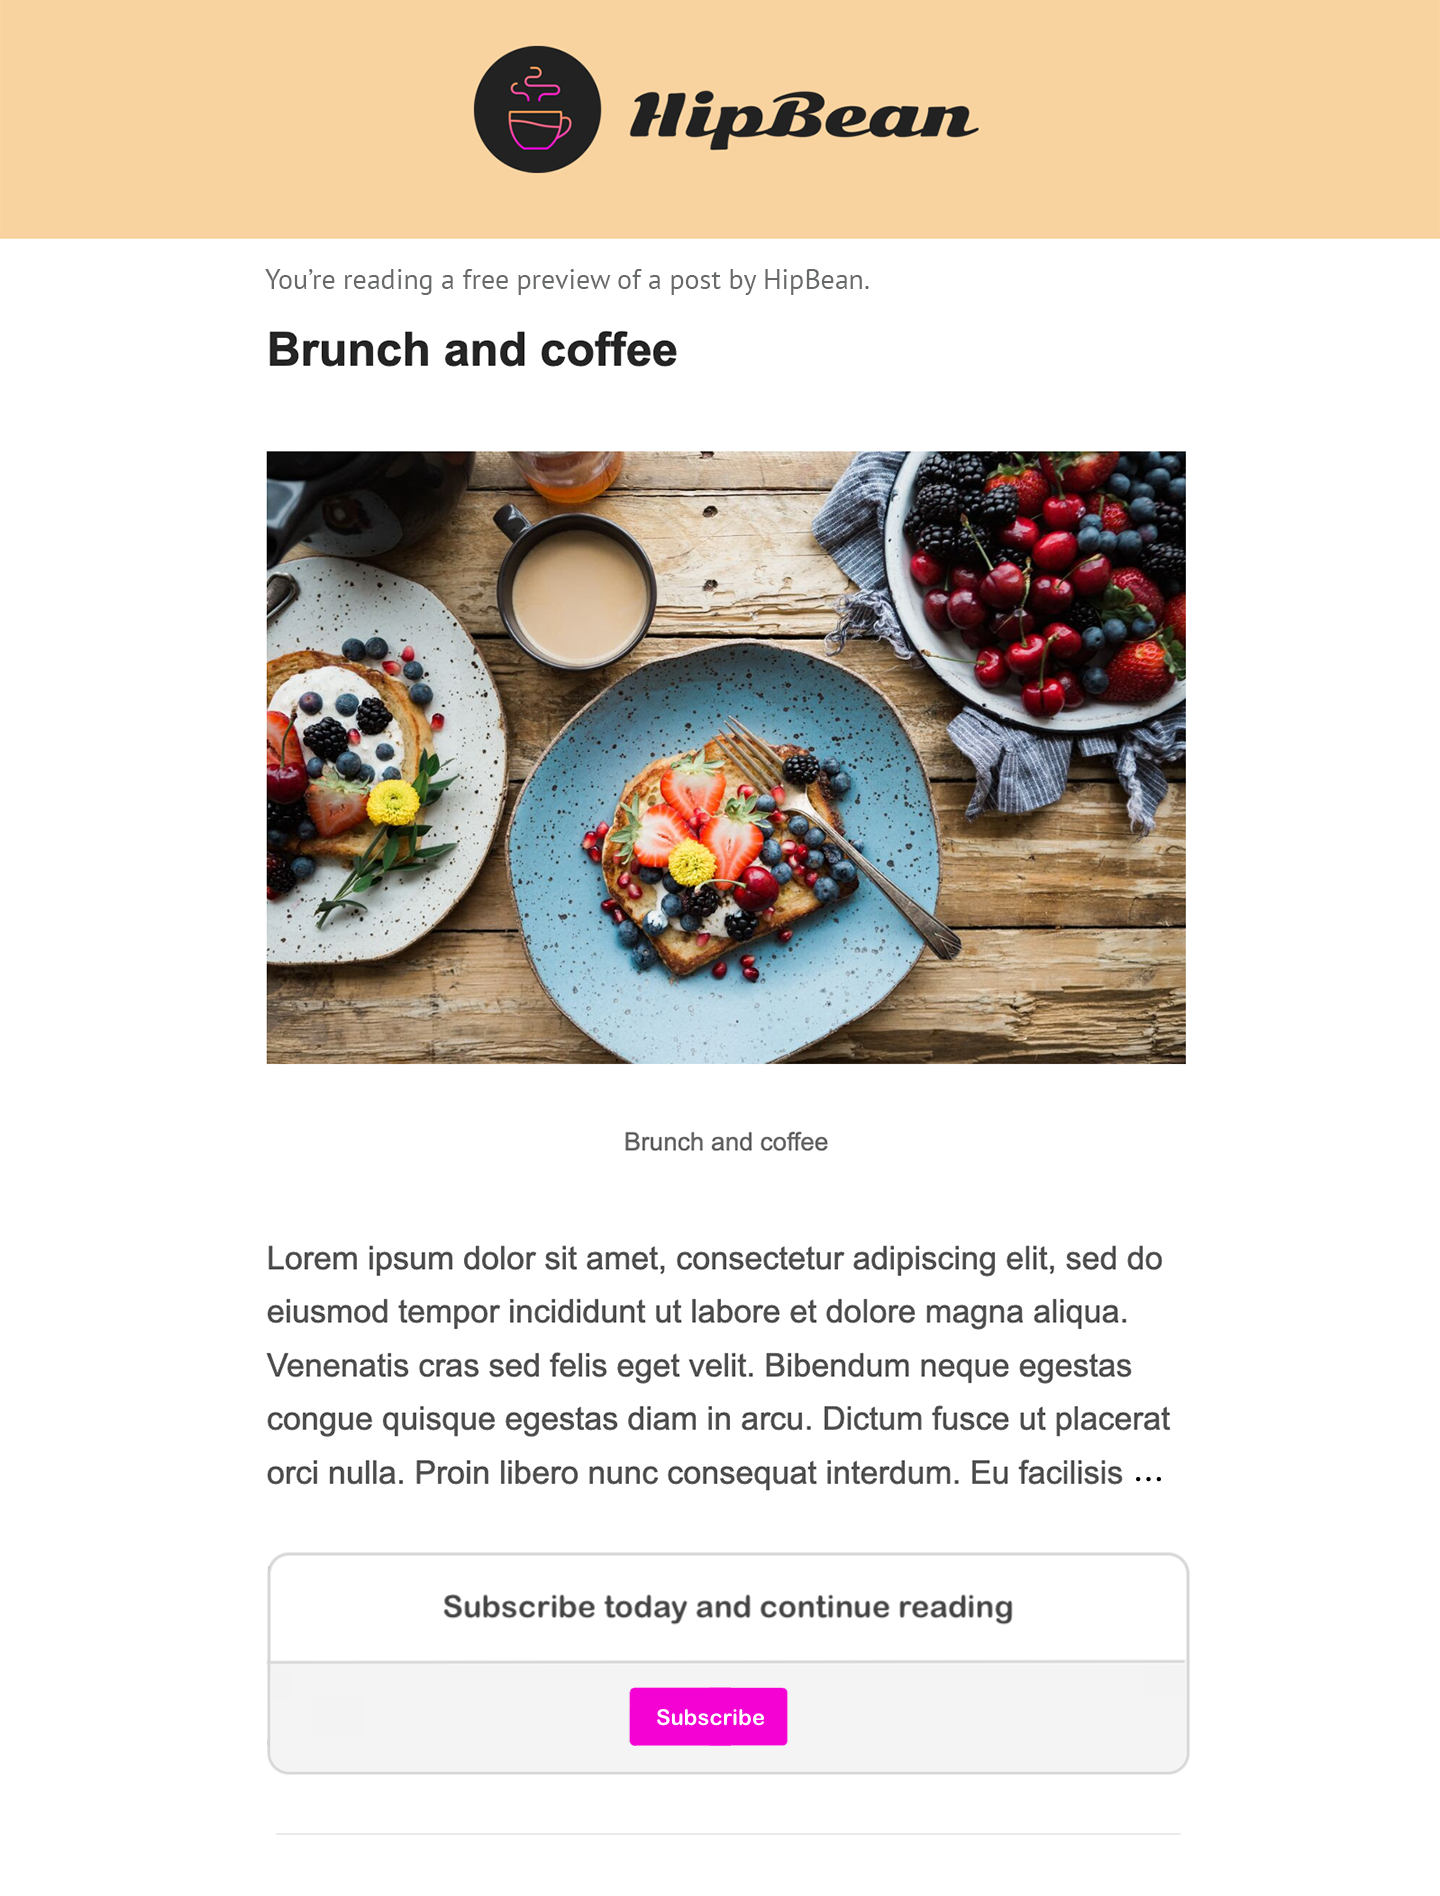
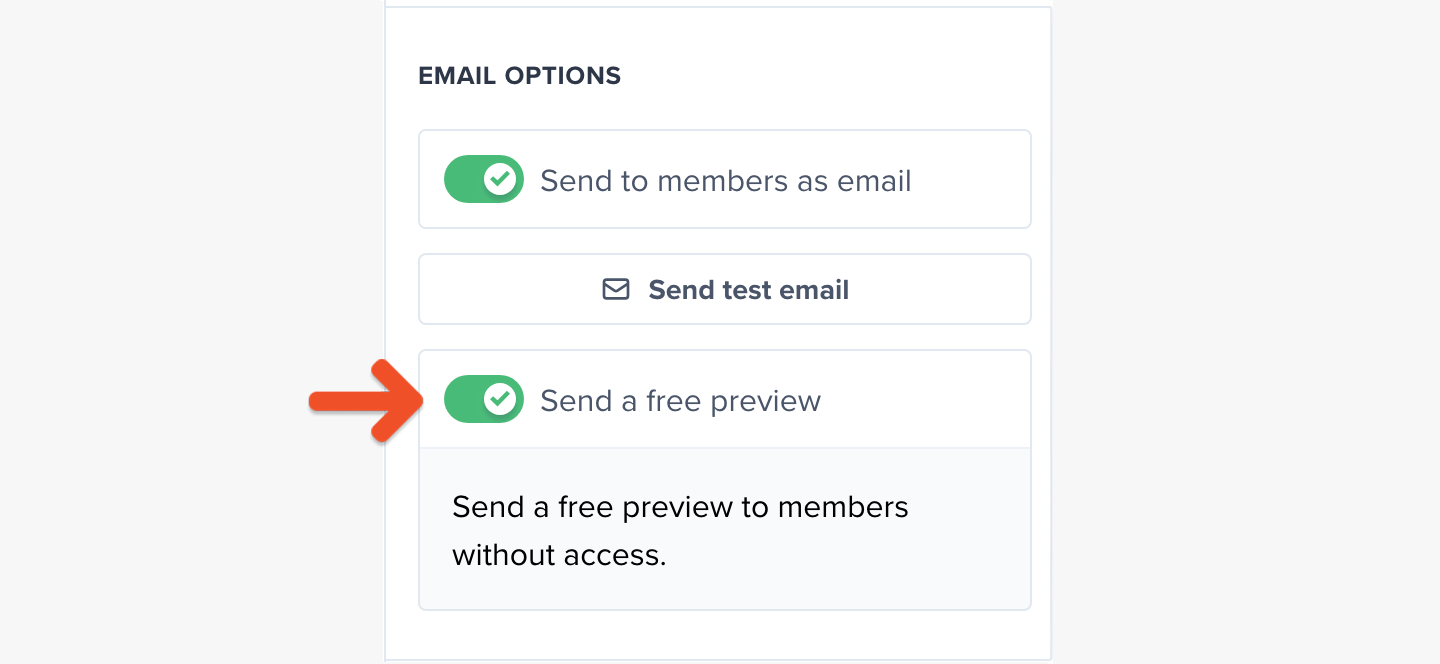
(Optional) Send a preview of your members-only newsletter
You can share a preview of your newsletter message to encourage readers to sign up for a membership plan. They'll see a short snippet of the content, followed by an invitation to subscribe in order to see the rest.
We show one of two paywall types depending on your subscribe page settings.
With your custom subscribe page enabled:
With your custom subscribe page disabled:
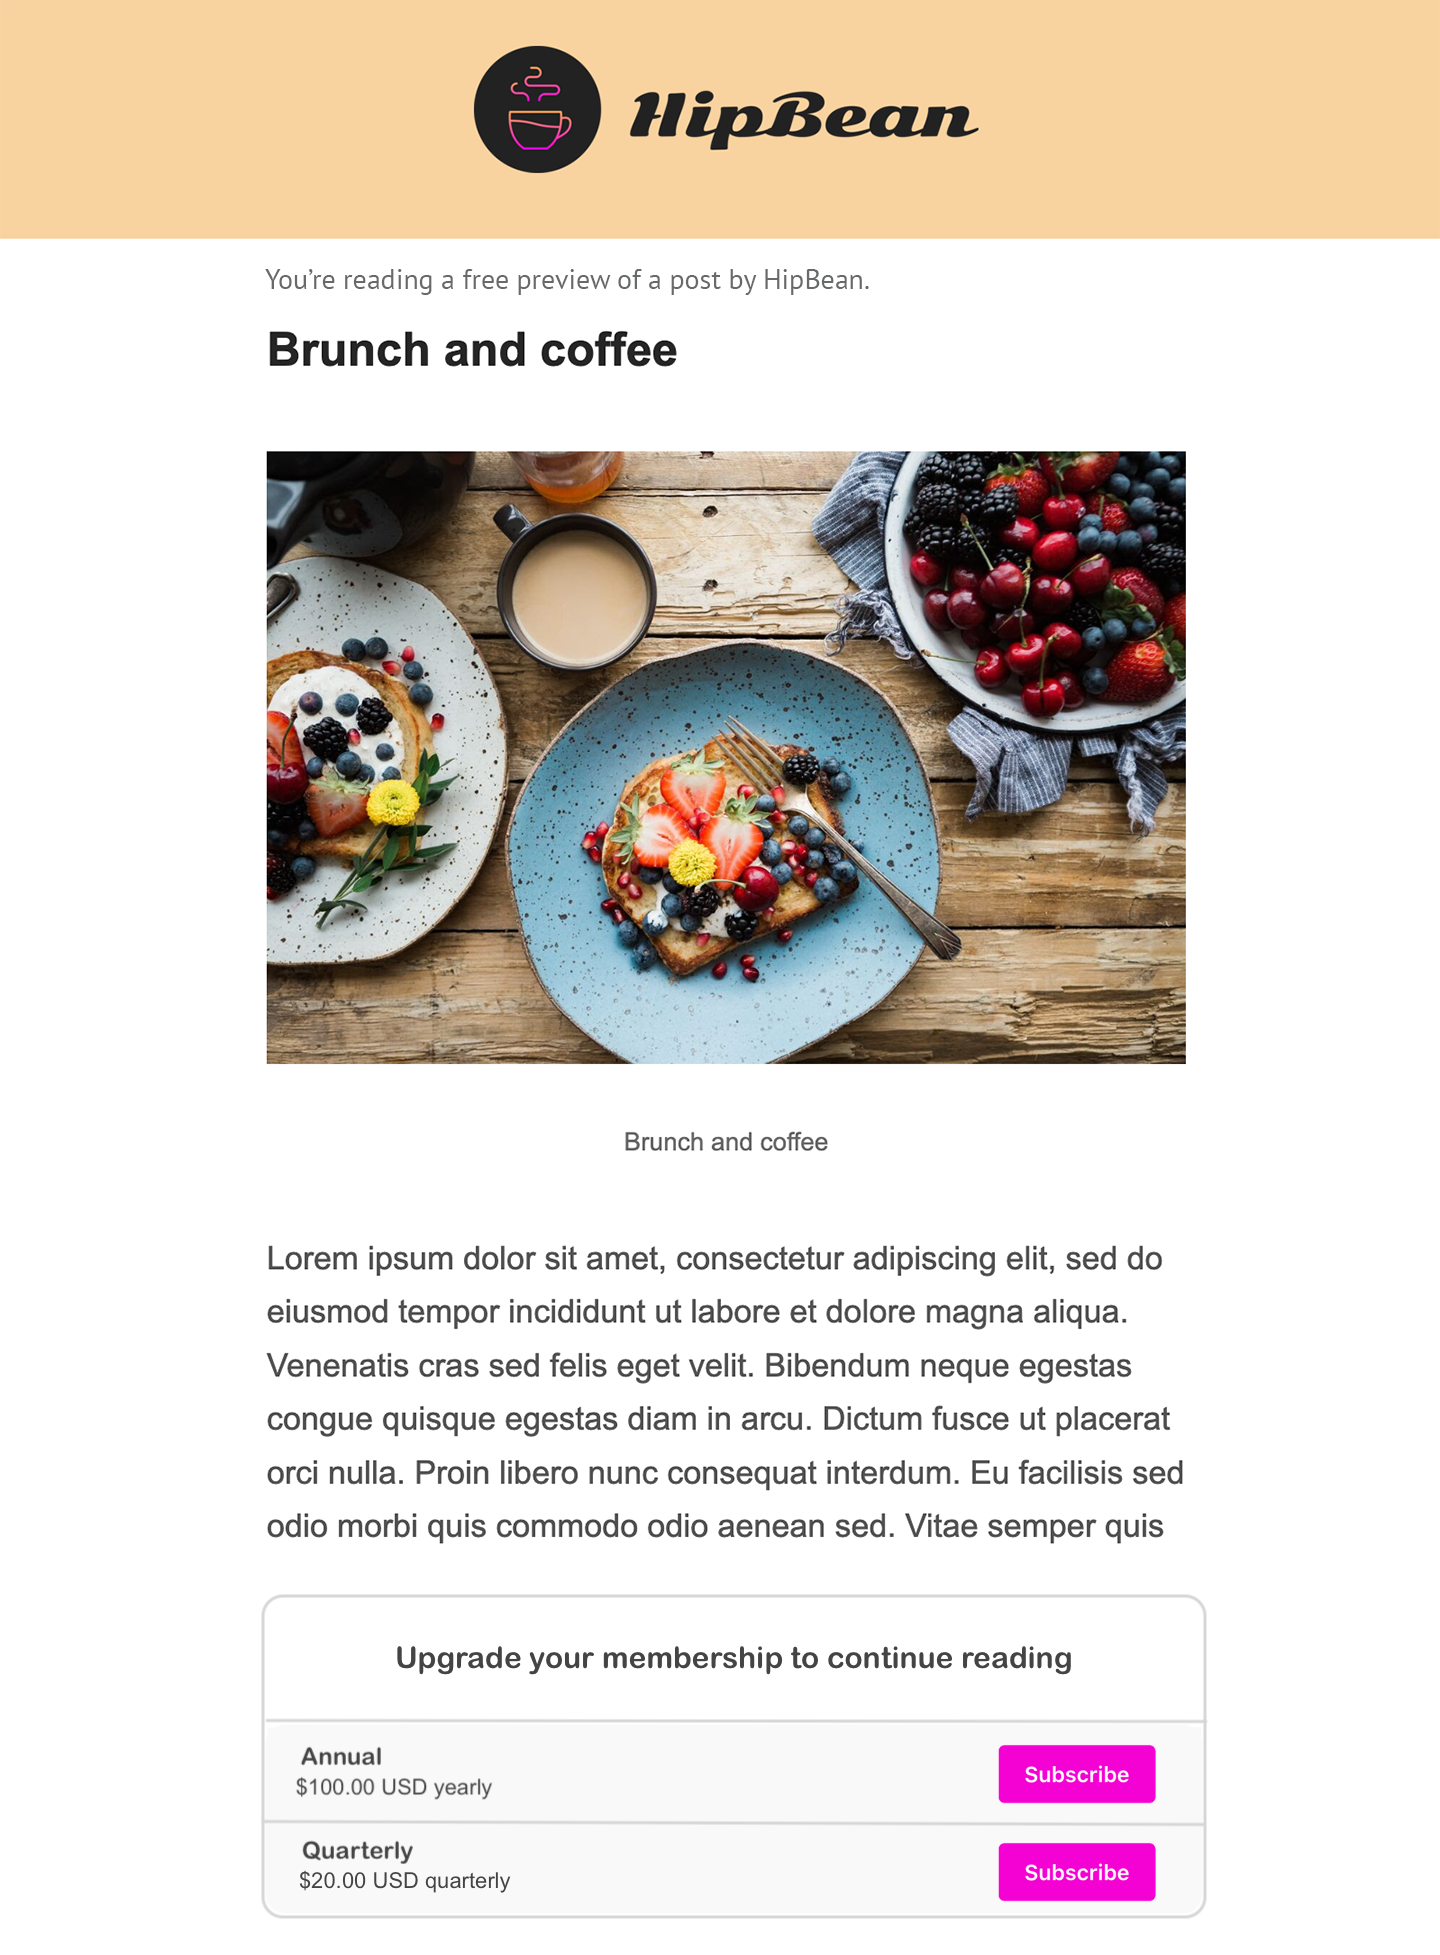
To send this preview version of the newsletter to members without access, enable the Send a free preview toggle.
Test the member experience
While your Memberful account is in test mode, use Stripe’s test credit cards to complete example member purchases and recreate their onboarding experience. Make sure to sign up with a different email address than the one associated with your website and Memberful admin account as using the same email address can cause unexpected errors.
You can also view any published post, write comments, and delete abusive ones while you’re signed in to your Memberful dashboard as an admin. Select a post and click View live post to get access.

Learn more about moderating post comments.
Make a lasting first impression with an onboarding program that highlights your best content and gets new members excited from the start. Set the tone for success and engagement right from day one. Check out Operator for tips on designing an onboarding experience that wows!
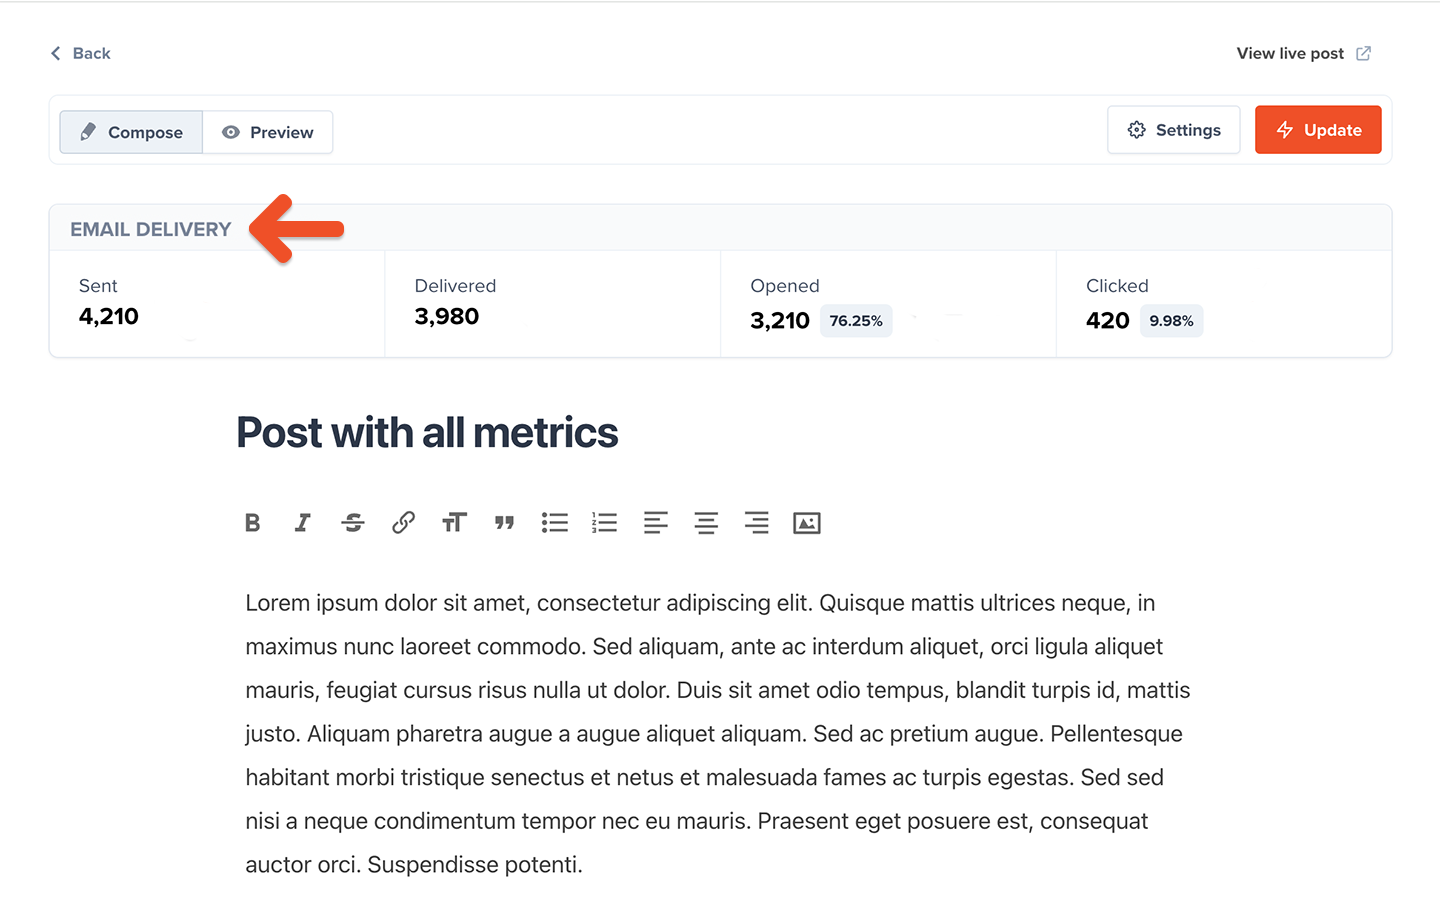
(Optional) Track sent post metrics
Posts include key analytics to give you insights into the newsletters you send to members.
Learn more about tracking post metrics.
Go live
When you’re ready to start processing orders, choose your currency and connect to your Stripe account via Settings → Stripe. We will automatically delete all your test orders and member accounts when you switch to live payments.
Nice work connecting to Stripe! 🚀
Now you’re ready to start selling memberships to your audience. Here are a few ideas to make your launch a success:
- Announce the membership on your social media pages.
- Link to the membership sign-up page in your social media profiles and upload special banners for launch month.
- Send a membership-specific email blast and add a link to the membership signup page in your email signature.
- Host a livestream or post a video to announce the membership.