> ## Documentation Index
> Fetch the complete documentation index at: https://memberful.com/docs/llms.txt
> Use this file to discover all available pages before exploring further.

# Add a link to buy a plan

> Add a Memberful purchase link to your WordPress site or any other website so visitors can buy a plan, customize the button text, and track signups.

export const RelatedDocs = ({link1, link2, link3, link4, link5, link6, link7, link8, link9, link10, className = ""}) => {
  const links = [link1, link2, link3, link4, link5, link6, link7, link8, link9, link10].filter(Boolean);
  if (!links.length) return null;
  return <section className={`related-docs border dark:border-gray-700 rounded-2xl px-6 py-4 mt-6 ${className}`}>
      <p className="mb-2 font-medium">
        <strong>Related help docs:</strong>
      </p>
      <ul className="space-y-1 mb-1 mt-1">
        {links.map((link, index) => <li key={index}>
            <a href={link.url}>{link.label}</a>
          </li>)}
      </ul>
    </section>;
};

Memberful generates a purchase link for each plan price. Add the link to a page or button on your website so visitors can subscribe.

In this help article, we'll show you how to add a plan purchase link to WordPress or another website builder.

## Add a purchase link in WordPress

<Steps>
  <Step title="Open a post or page">
    From your WordPress dashboard, open the post or page where you want to add the purchase link.
  </Step>

  <Step title="Open the Memberful menu">
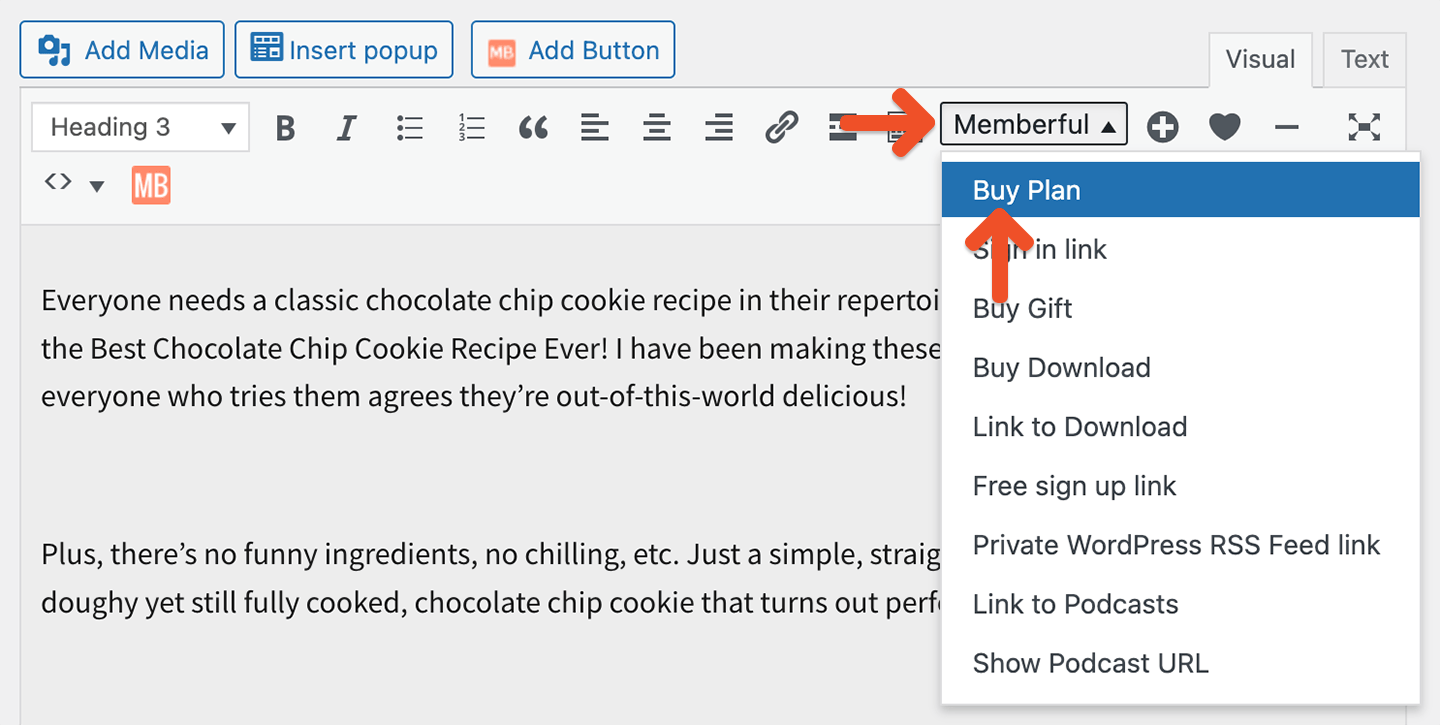
    Click **Memberful** in the WordPress editor.
  </Step>

  <Step title="Select the shortcode">
    Select **Buy Plan**.

    <Frame>
      <img src="https://mintcdn.com/memberful/wJEwKgftUVsHWEYv/images/plans/add-a-link-to-buy-a-plan/text-based-purchase-link.png?fit=max&auto=format&n=wJEwKgftUVsHWEYv&q=85&s=d33da9579756c724926a9e26b588e872" alt="Select Buy Plan from the Memberful menu in the WordPress editor" width="1440" height="725" data-path="images/plans/add-a-link-to-buy-a-plan/text-based-purchase-link.png" />
    </Frame>
  </Step>

  <Step title="Choose a plan">
    Choose the plan you want to sell from the dropdown.
  </Step>

  <Step title="Enter the link text">
    Enter the text for the link, such as `Become a member - $15/month`.

    <Frame>
      <img src="https://mintcdn.com/memberful/nTKt73Dil0XemOnb/images/plans/add-a-link-to-buy-a-plan/purchase-link-text.png?fit=max&auto=format&n=nTKt73Dil0XemOnb&q=85&s=24611add3653baa7674ef8b118d52c22" alt="Enter the text for the purchase link" width="1440" height="874" data-path="images/plans/add-a-link-to-buy-a-plan/purchase-link-text.png" />
    </Frame>
  </Step>

  <Step title="Add the link">
    Click **OK**.
  </Step>
</Steps>

### Add a link in the HTML editor

If you're writing HTML in the WordPress editor, click **Text**, then add the link with an HTML link tag:

```html theme={null}
<a href="https://demo.memberful.com/checkout?plan=140">Become a member</a>
```

## Add a purchase button with any website builder

<Steps>
  <Step title="Open your plans">
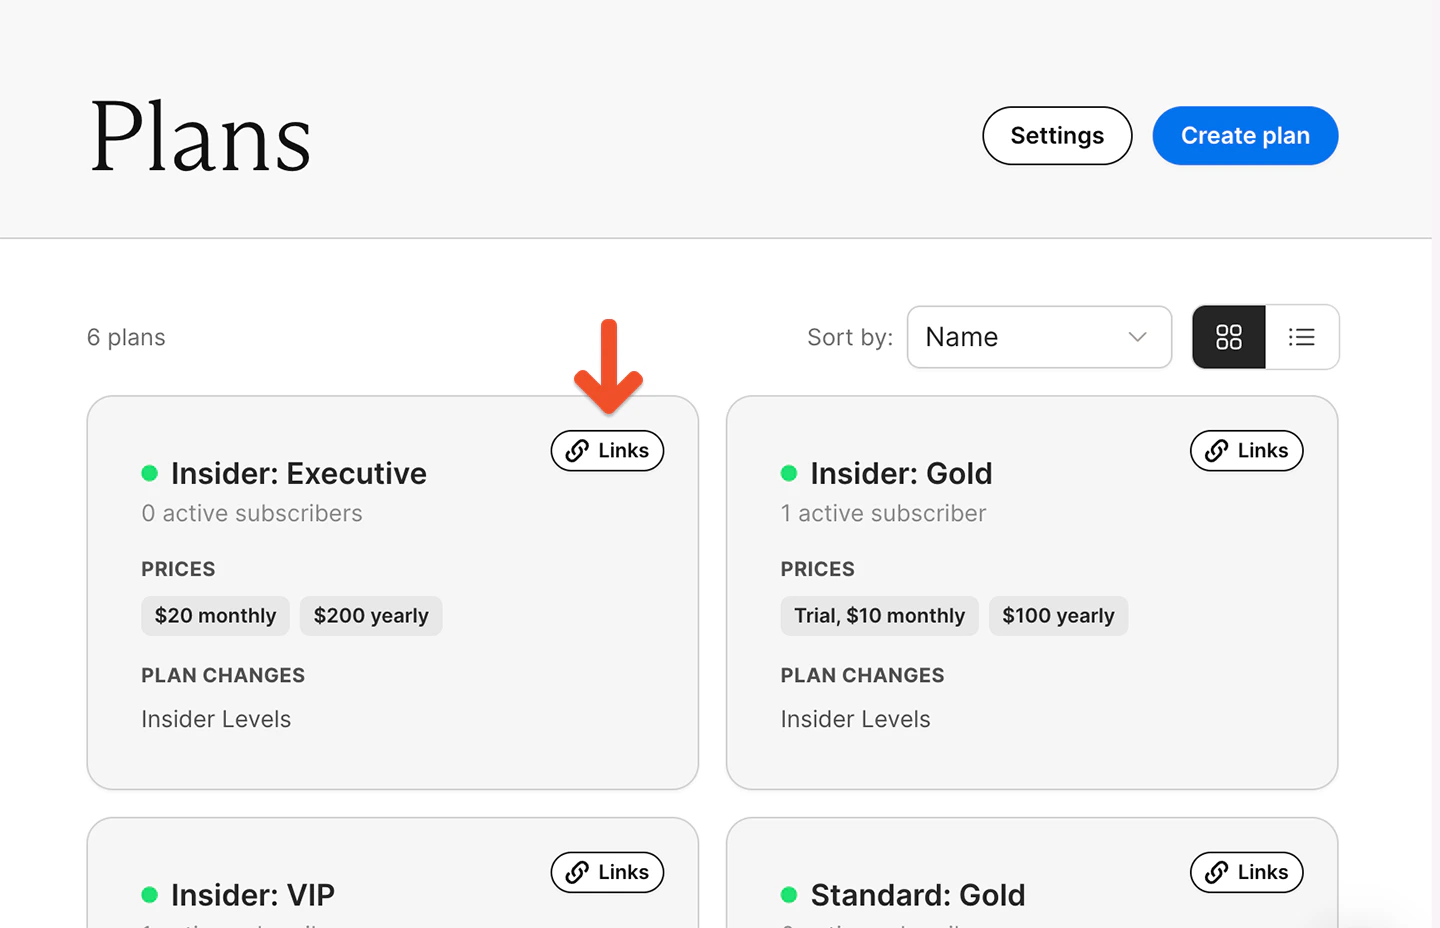
    In the Memberful dashboard, go to **Revenue** → **Plans**.
  </Step>

  <Step title="Open the plan links">
    Click **Links** for the plan you want to sell.

    <Frame>
      <img src="https://mintcdn.com/memberful/DpIOylNdwyisnde_/images/plans/add-a-link-to-buy-a-plan/plan-links.png?fit=max&auto=format&n=DpIOylNdwyisnde_&q=85&s=7f41bd3d8adcbe742d20601a10a2b590" alt="Links button for a plan in the Memberful dashboard" width="1440" height="928" data-path="images/plans/add-a-link-to-buy-a-plan/plan-links.png" />
    </Frame>
  </Step>

  <Step title="Choose a price">
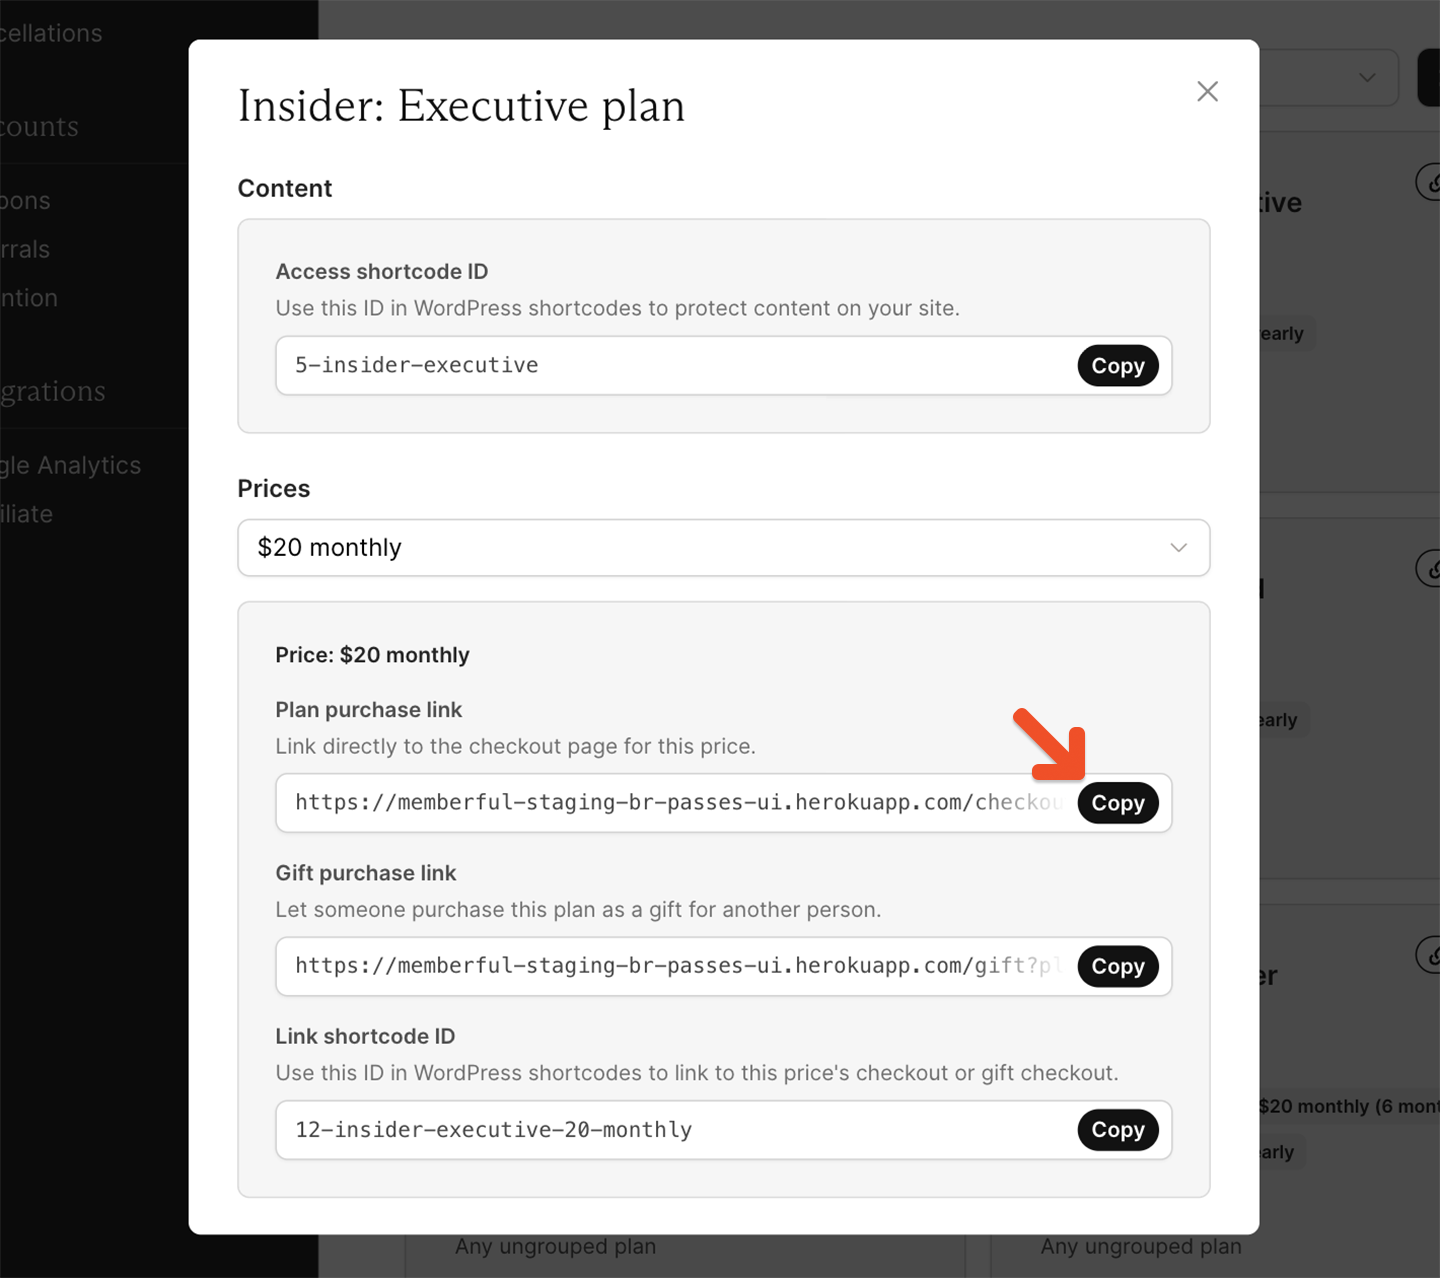
    Select the price you want to sell from the *Prices* dropdown.
  </Step>

  <Step title="Copy the purchase link">
    Click **Copy** next to the *Plan purchase link*.

    <Frame>
      <img src="https://mintcdn.com/memberful/DpIOylNdwyisnde_/images/plans/add-a-link-to-buy-a-plan/plan-urls.png?fit=max&auto=format&n=DpIOylNdwyisnde_&q=85&s=6ad20a9632af66b4b53b016bec37f94e" alt="Plan purchase link for the selected price in the Memberful dashboard" width="1440" height="1278" data-path="images/plans/add-a-link-to-buy-a-plan/plan-urls.png" />
    </Frame>
  </Step>

  <Step title="Add the link to a button">
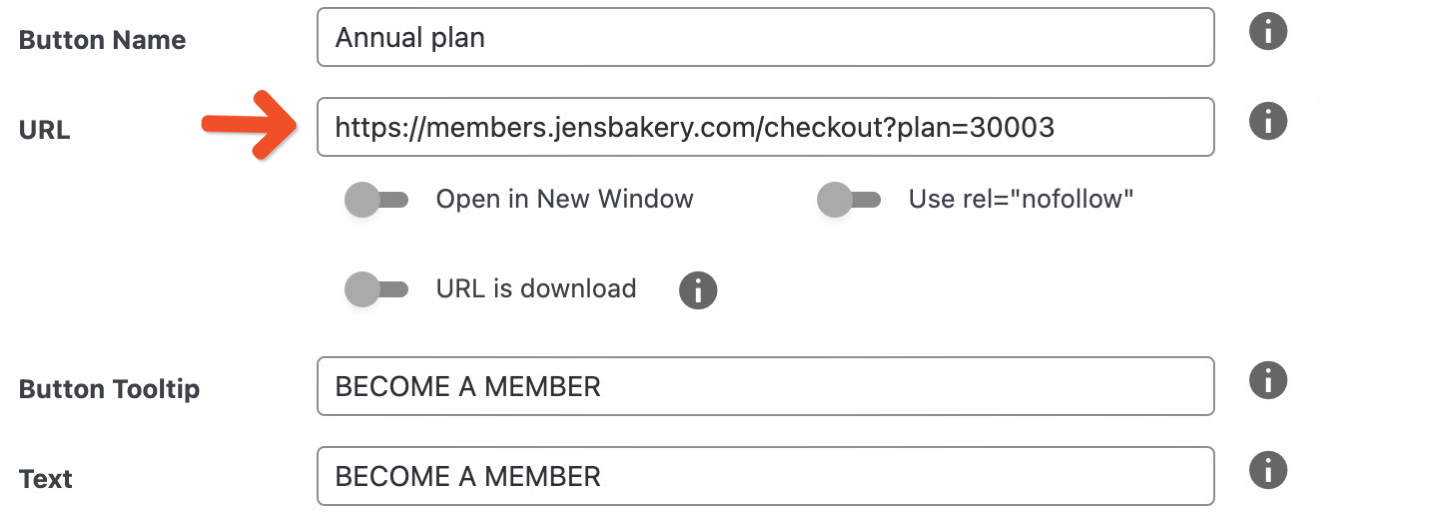
    Add the copied link to a button using the options provided by your website builder.
    <Frame>
      <img src="https://mintcdn.com/memberful/wJEwKgftUVsHWEYv/images/plans/add-a-link-to-buy-a-plan/button-builder.png?fit=max&auto=format&n=wJEwKgftUVsHWEYv&q=85&s=ace0e9988ba74acf96ac03a906be35d1" alt="Purchase link added to a website button builder" width="1440" height="521" data-path="images/plans/add-a-link-to-buy-a-plan/button-builder.png" />
    </Frame>
  </Step>
</Steps>

If you're using WordPress and your theme doesn't have a button builder, install a plugin such as [MaxButtons](https://wordpress.org/plugins/maxbuttons/).

<Callout icon="lightbulb" color="#4DA3FF">
  Place links or buttons in high-visibility areas such as your homepage or navigation, clearly communicate pricing in the button text, and use consistent messaging across your site so it aligns with your plans.
</Callout>

<RelatedDocs
  link1={{
url: "/wordpress-plugin/setup/member-account-links/",
label: "Add member account links",
}}
  link2={{
url: "/wordpress-plugin/protect-content/restrict-access-to-a-single-post/",
label: "Protect a WordPress post or page",
}}
  link3={{
url: "/discounts-and-gifting/gifts/add-gift-link/",
label: "Add a link to buy a gift",
}}
  link4={{
url: "/configuration/other-settings/configure-redirect-settings/",
label: "Configure redirect settings",
}}
/>