> ## Documentation Index
> Fetch the complete documentation index at: https://memberful.com/docs/llms.txt
> Use this file to discover all available pages before exploring further.
# Sign members into applications via OAuth 2.0
> Sign members in to your custom web or mobile apps using Memberful's OAuth provider. Authenticate members securely without managing your own login system.
export const RelatedDocs = ({link1, link2, link3, link4, link5, link6, link7, link8, link9, link10, className = ""}) => {
const links = [link1, link2, link3, link4, link5, link6, link7, link8, link9, link10].filter(Boolean);
if (!links.length) return null;
return ;
};
export const Video = ({url}) => {
return
;
};
Memberful supports the [OAuth 2.0 protocol](https://oauth.net/2) for authentication, which means that you can use Memberful as the sign-in mechanism for your custom applications, including both web and mobile apps.
Members sign in to your app or website via Memberful's sign-in process. Once we've confirmed they're signed in, your app can pull the member's data from our API.
## OAuth process overview
In this help article, we'll walk through the process of setting up OAuth for your app, one step at a time.
We've also included a [reference diagram of the OAuth flow](#oauth-flow-reference-diagram) and well-documented [code examples](#code-examples) at the end of this help doc.
Here's a high-level overview of the process we'll follow to set this up:
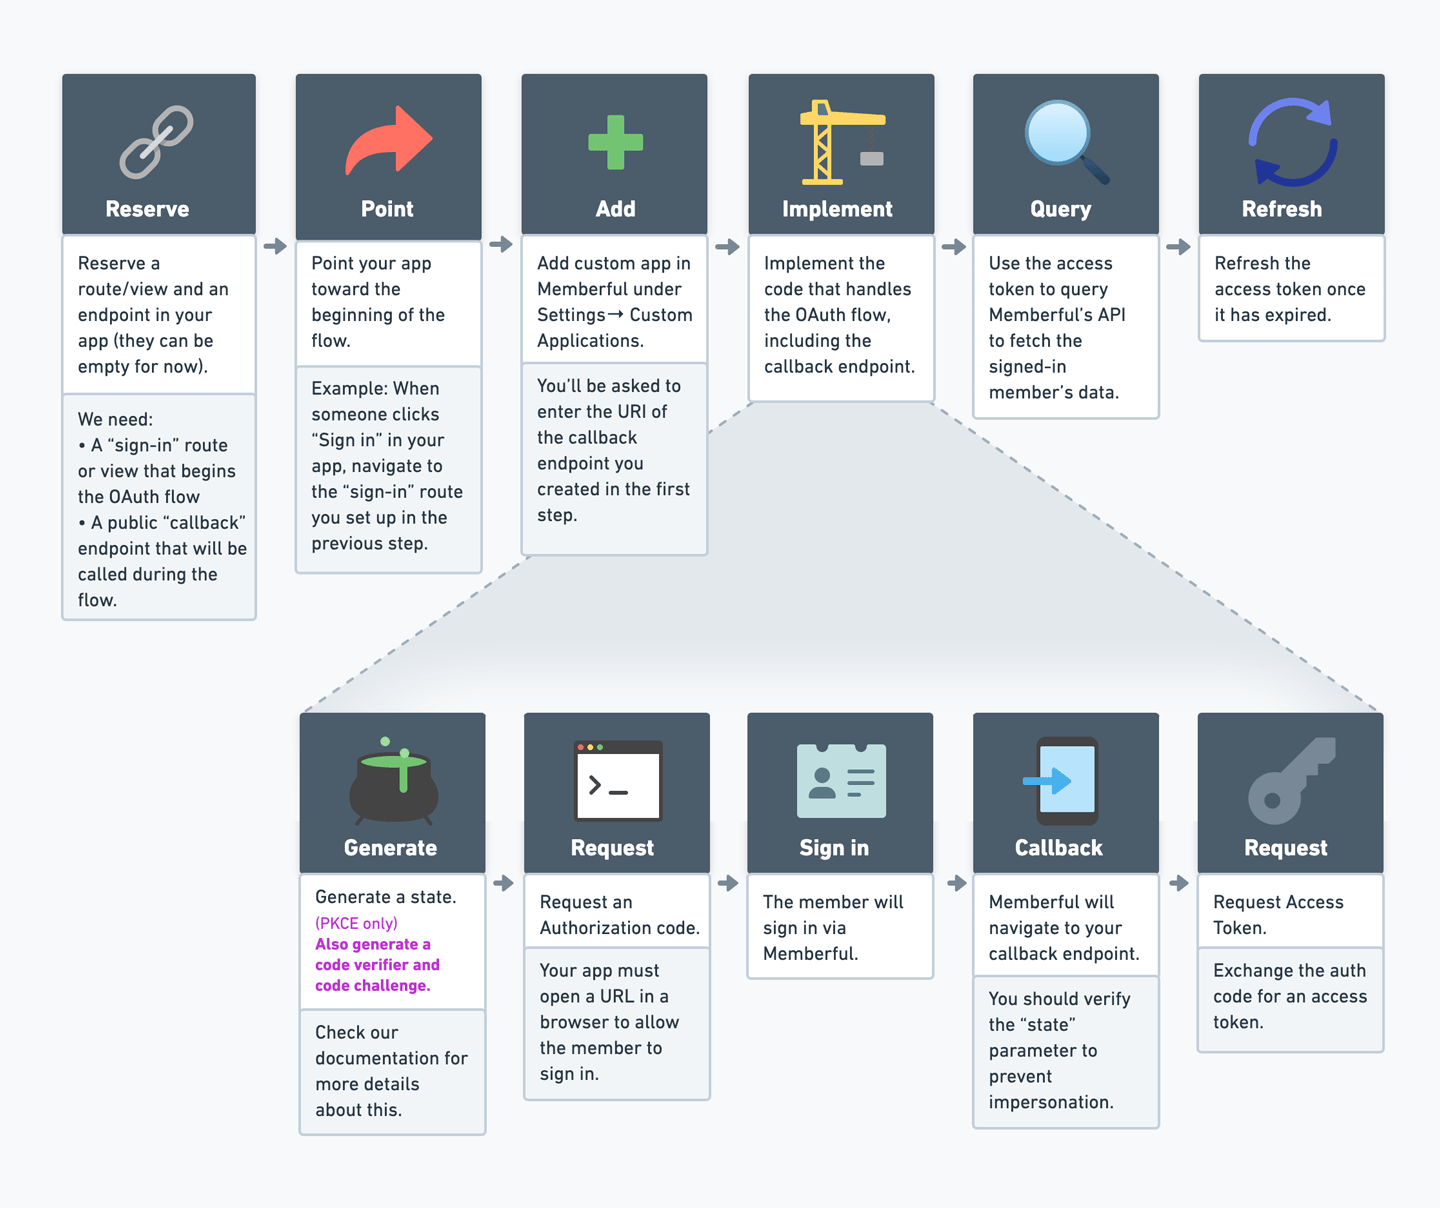 The big-picture objective of the OAuth flow is to obtain an access token that can be used to access a member's data, including their name, email, and subscriptions. To obtain an access token, your application will follow the [OAuth 2.0 Authorization Code flow](https://www.oauth.com/oauth2-servers/server-side-apps/authorization-code/).
Over the following sections, we'll go through this process one step at a time.
## Prepare your app
Before we can set up OAuth with Memberful, your app needs to be able to initiate the OAuth flow and later receive the necessary codes, so we'll need to set up a route and an endpoint in your app.
The big-picture objective of the OAuth flow is to obtain an access token that can be used to access a member's data, including their name, email, and subscriptions. To obtain an access token, your application will follow the [OAuth 2.0 Authorization Code flow](https://www.oauth.com/oauth2-servers/server-side-apps/authorization-code/).
Over the following sections, we'll go through this process one step at a time.
## Prepare your app
Before we can set up OAuth with Memberful, your app needs to be able to initiate the OAuth flow and later receive the necessary codes, so we'll need to set up a route and an endpoint in your app.
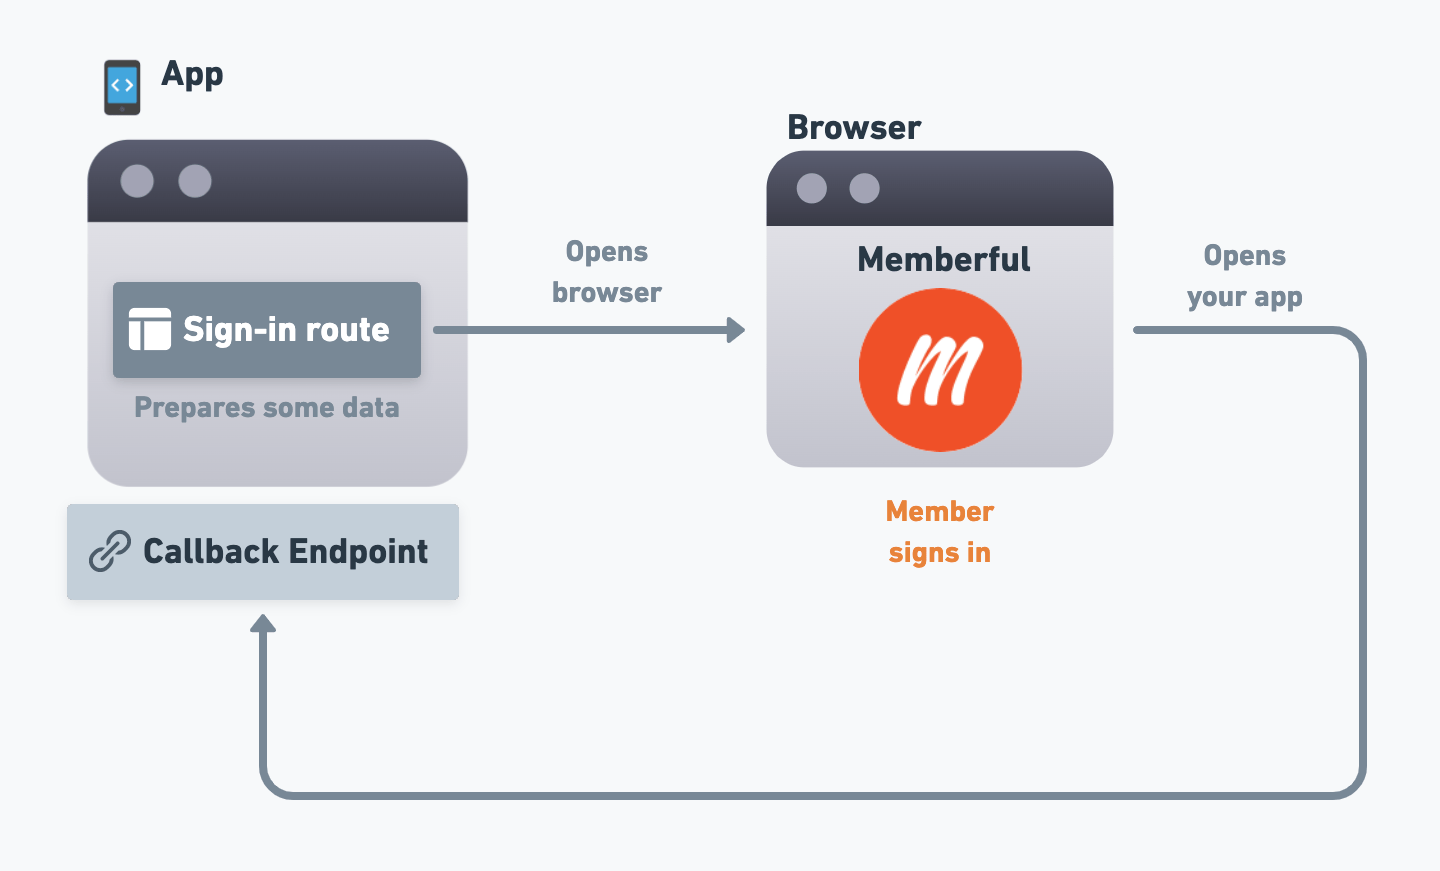 ### Sign-in route
Your app needs to initiate the sign-in process, so you'll need to set up a "sign-in" route/view that will start the flow. For example, there could be a "Sign in" button in your app that, when clicked, will navigate to this route.
We'll go over the specifics of what this route needs to do in a future section, but for now, create that route and make sure that your users can navigate to it from within your app.
### Callback endpoint
Over the course of the OAuth flow, members will sign in via Memberful, and then Memberful will need to redirect the user back to your app. This is where the "callback" endpoint comes in.
The callback endpoint is where Memberful will redirect the user to after they've signed in, and it's where your app will receive some codes as query string parameters that it can use to complete the process.
We'll go over the specifics of what this endpoint needs to do in a future section, but for now, create the endpoint in your app and make sure that Memberful (running on a browser window) can navigate to it, and that your app can extract the query string parameters from the URI.
If you're creating a mobile app, we'll go over how to navigate from a browser back to the app in the next section.
## Add a Custom Application
Now we'll add a custom application to your Memberful account. This will help Memberful determine how to execute the OAuth flow for your app, and it will generate some necessary codes for your app to use.
Go to *Settings → Custom applications → Add a new Custom Application*. Enter a name for the app (the name is just for your own reference) and check the box next to *Include OAuth tokens with this application*.
### Sign-in route
Your app needs to initiate the sign-in process, so you'll need to set up a "sign-in" route/view that will start the flow. For example, there could be a "Sign in" button in your app that, when clicked, will navigate to this route.
We'll go over the specifics of what this route needs to do in a future section, but for now, create that route and make sure that your users can navigate to it from within your app.
### Callback endpoint
Over the course of the OAuth flow, members will sign in via Memberful, and then Memberful will need to redirect the user back to your app. This is where the "callback" endpoint comes in.
The callback endpoint is where Memberful will redirect the user to after they've signed in, and it's where your app will receive some codes as query string parameters that it can use to complete the process.
We'll go over the specifics of what this endpoint needs to do in a future section, but for now, create the endpoint in your app and make sure that Memberful (running on a browser window) can navigate to it, and that your app can extract the query string parameters from the URI.
If you're creating a mobile app, we'll go over how to navigate from a browser back to the app in the next section.
## Add a Custom Application
Now we'll add a custom application to your Memberful account. This will help Memberful determine how to execute the OAuth flow for your app, and it will generate some necessary codes for your app to use.
Go to *Settings → Custom applications → Add a new Custom Application*. Enter a name for the app (the name is just for your own reference) and check the box next to *Include OAuth tokens with this application*.
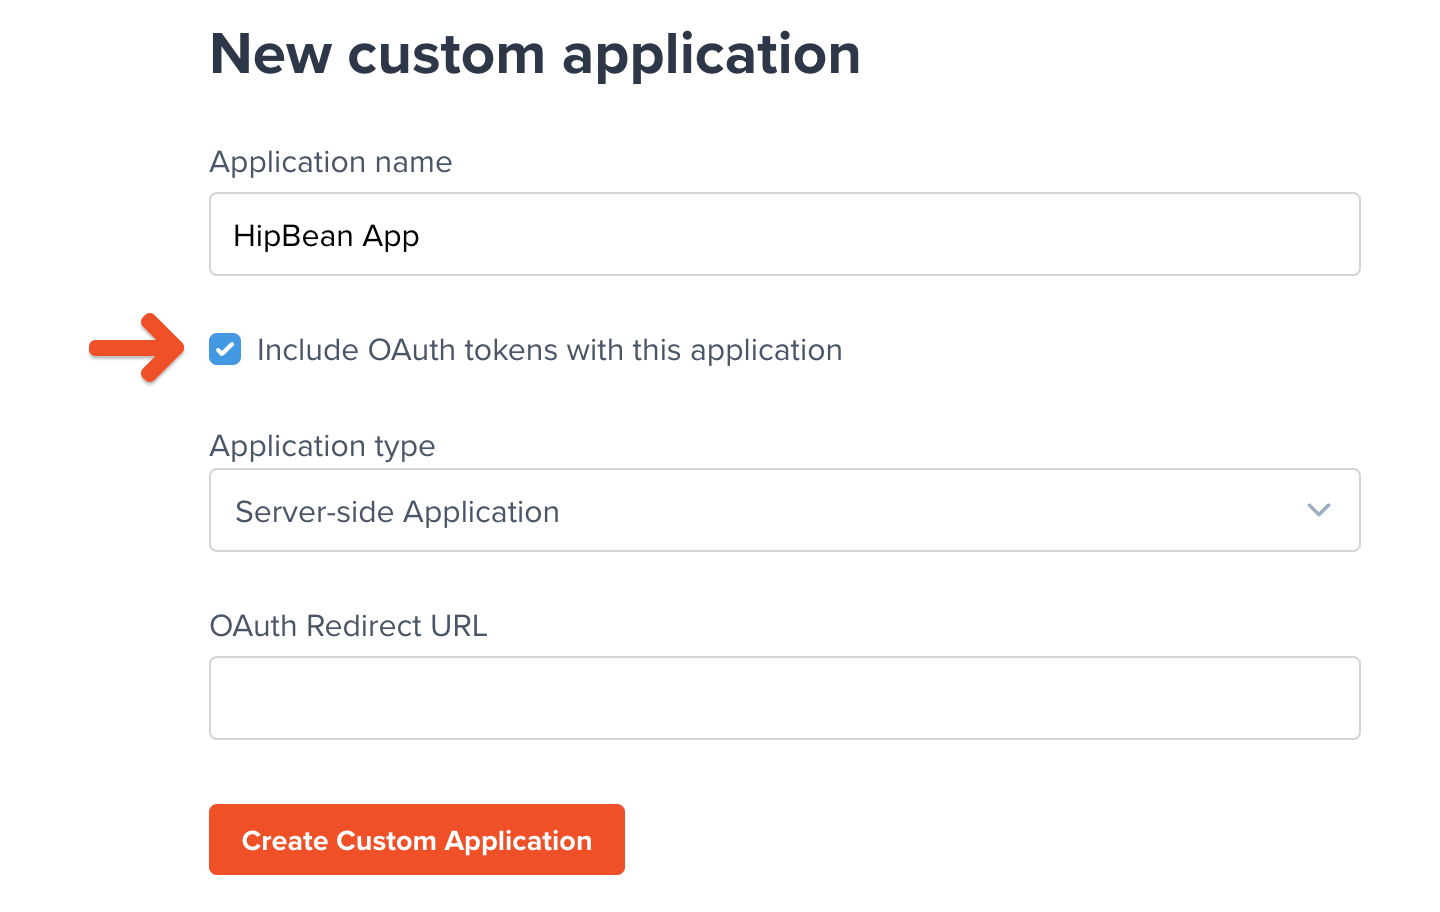 You'll be able to choose from one of three application types: Server-side, Single-page, and Mobile.
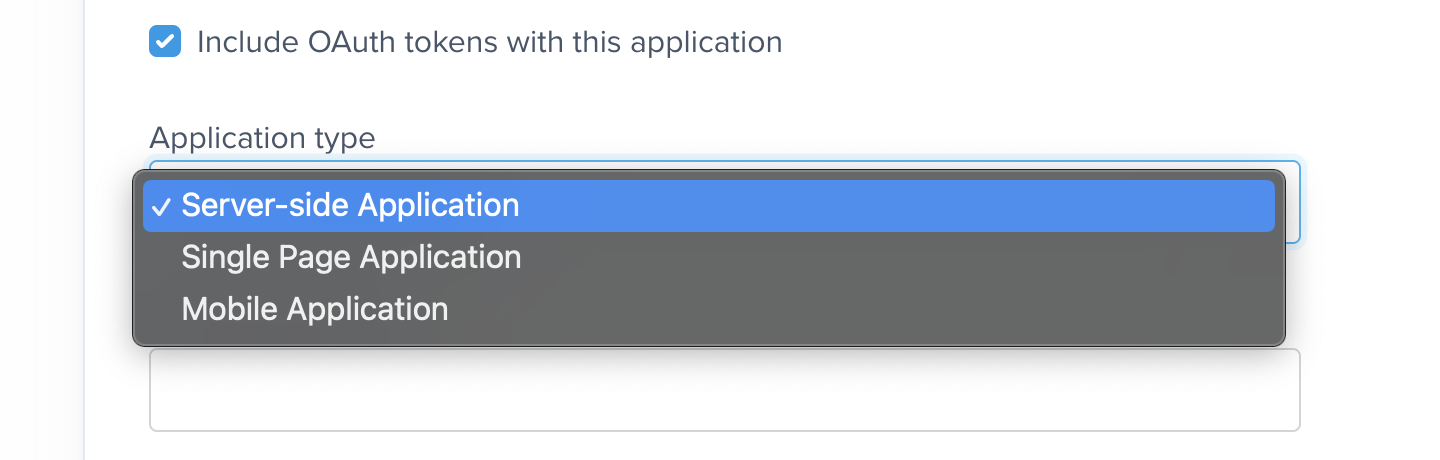 ### Server-side application
The setup process for Server-side Apps **(SSA)** is simpler than for client-side apps (Single Page or Mobile Applications), as you'll be given a `client_secret` code instead of having to deal with the more complex Proof Key of Code Exchange (PKCE) process (more on that below).
However, this should only be used for 100% server-side applications because if the `client_secret` ends up in client-side code *it will be compromised*, and bad actors could use it to impersonate your application and access member data.
### Single page application
[Single Page applications](https://www.oauth.com/oauth2-servers/single-page-apps/) can't secure a client secret, so one is not generated or required.
These applications must provide Proof Key of Code Exchange **(PKCE)** parameters described below.
### Mobile application
Like single page applications, [mobile and native apps](https://www.oauth.com/oauth2-servers/mobile-and-native-apps/) do not use a client secret and must provide Proof Key of Code Exchange **(PKCE)** parameters.
What makes mobile applications unique is that they may use a [private URI scheme or claimed "https" scheme](https://www.oauth.com/oauth2-servers/redirect-uris/redirect-uris-native-apps/) as the redirect URI.
The OAuth standard best practice recommends that private URI schemes match a domain you control, in reverse, such as `com.example.app` if your domain is `app.example.com`.
The flow is similar for all application types, but single-page and mobile applications must provide Proof Key of Code Exchange (PKCE) parameters, while Server-Side Applications must provide a client secret parameter.
To remind you of this, any section or parameter that only applies to a specific app type will be labeled **(PKCE only)** or **(SSA only)** in the instructions below.
### OAuth redirect URL
Once you've selected an application type, populate the *OAuth Redirect URL* field with the URL/URI of the "callback" endpoint you created earlier in your app. When Memberful is running on a browser, it should be able to navigate to this address and have your app open up on that endpoint to continue the process.
### Server-side application
The setup process for Server-side Apps **(SSA)** is simpler than for client-side apps (Single Page or Mobile Applications), as you'll be given a `client_secret` code instead of having to deal with the more complex Proof Key of Code Exchange (PKCE) process (more on that below).
However, this should only be used for 100% server-side applications because if the `client_secret` ends up in client-side code *it will be compromised*, and bad actors could use it to impersonate your application and access member data.
### Single page application
[Single Page applications](https://www.oauth.com/oauth2-servers/single-page-apps/) can't secure a client secret, so one is not generated or required.
These applications must provide Proof Key of Code Exchange **(PKCE)** parameters described below.
### Mobile application
Like single page applications, [mobile and native apps](https://www.oauth.com/oauth2-servers/mobile-and-native-apps/) do not use a client secret and must provide Proof Key of Code Exchange **(PKCE)** parameters.
What makes mobile applications unique is that they may use a [private URI scheme or claimed "https" scheme](https://www.oauth.com/oauth2-servers/redirect-uris/redirect-uris-native-apps/) as the redirect URI.
The OAuth standard best practice recommends that private URI schemes match a domain you control, in reverse, such as `com.example.app` if your domain is `app.example.com`.
The flow is similar for all application types, but single-page and mobile applications must provide Proof Key of Code Exchange (PKCE) parameters, while Server-Side Applications must provide a client secret parameter.
To remind you of this, any section or parameter that only applies to a specific app type will be labeled **(PKCE only)** or **(SSA only)** in the instructions below.
### OAuth redirect URL
Once you've selected an application type, populate the *OAuth Redirect URL* field with the URL/URI of the "callback" endpoint you created earlier in your app. When Memberful is running on a browser, it should be able to navigate to this address and have your app open up on that endpoint to continue the process.
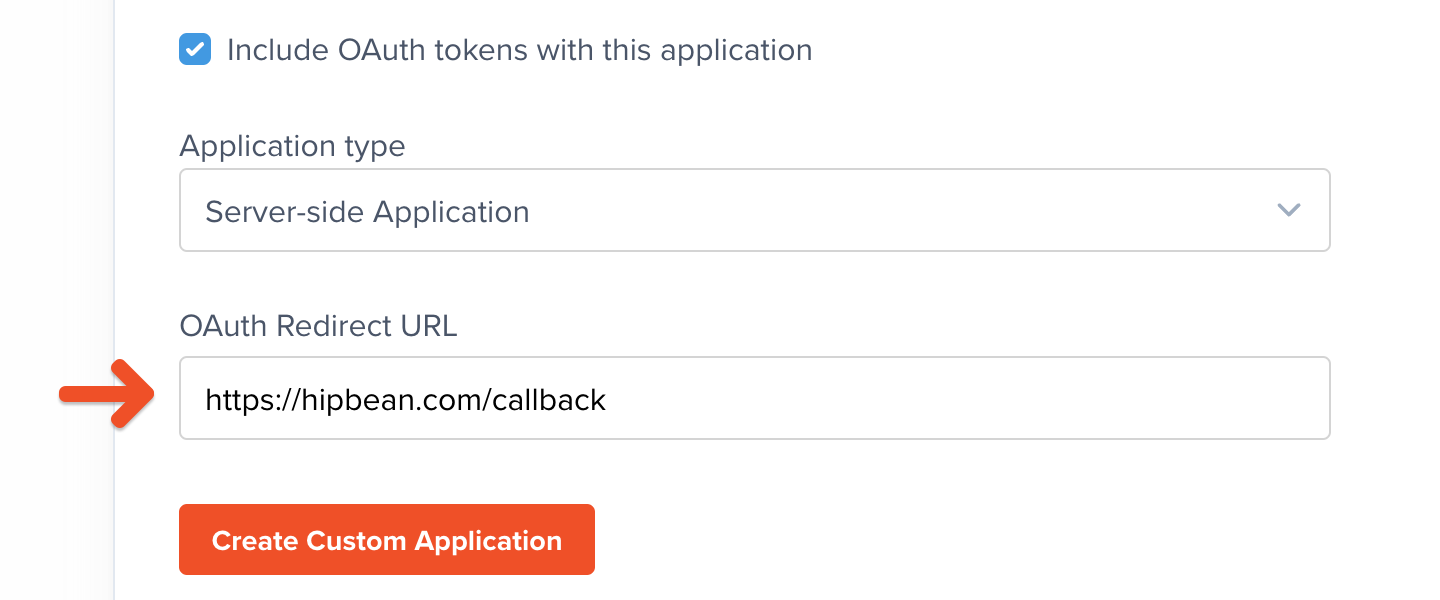 Click **Create Custom Application** to save your settings.
## Generate the necessary codes
It's time to implement the functionality of the "sign-in" route we created earlier. This route will generate the necessary codes and then open up a browser window to start the OAuth flow.
Click **Create Custom Application** to save your settings.
## Generate the necessary codes
It's time to implement the functionality of the "sign-in" route we created earlier. This route will generate the necessary codes and then open up a browser window to start the OAuth flow.
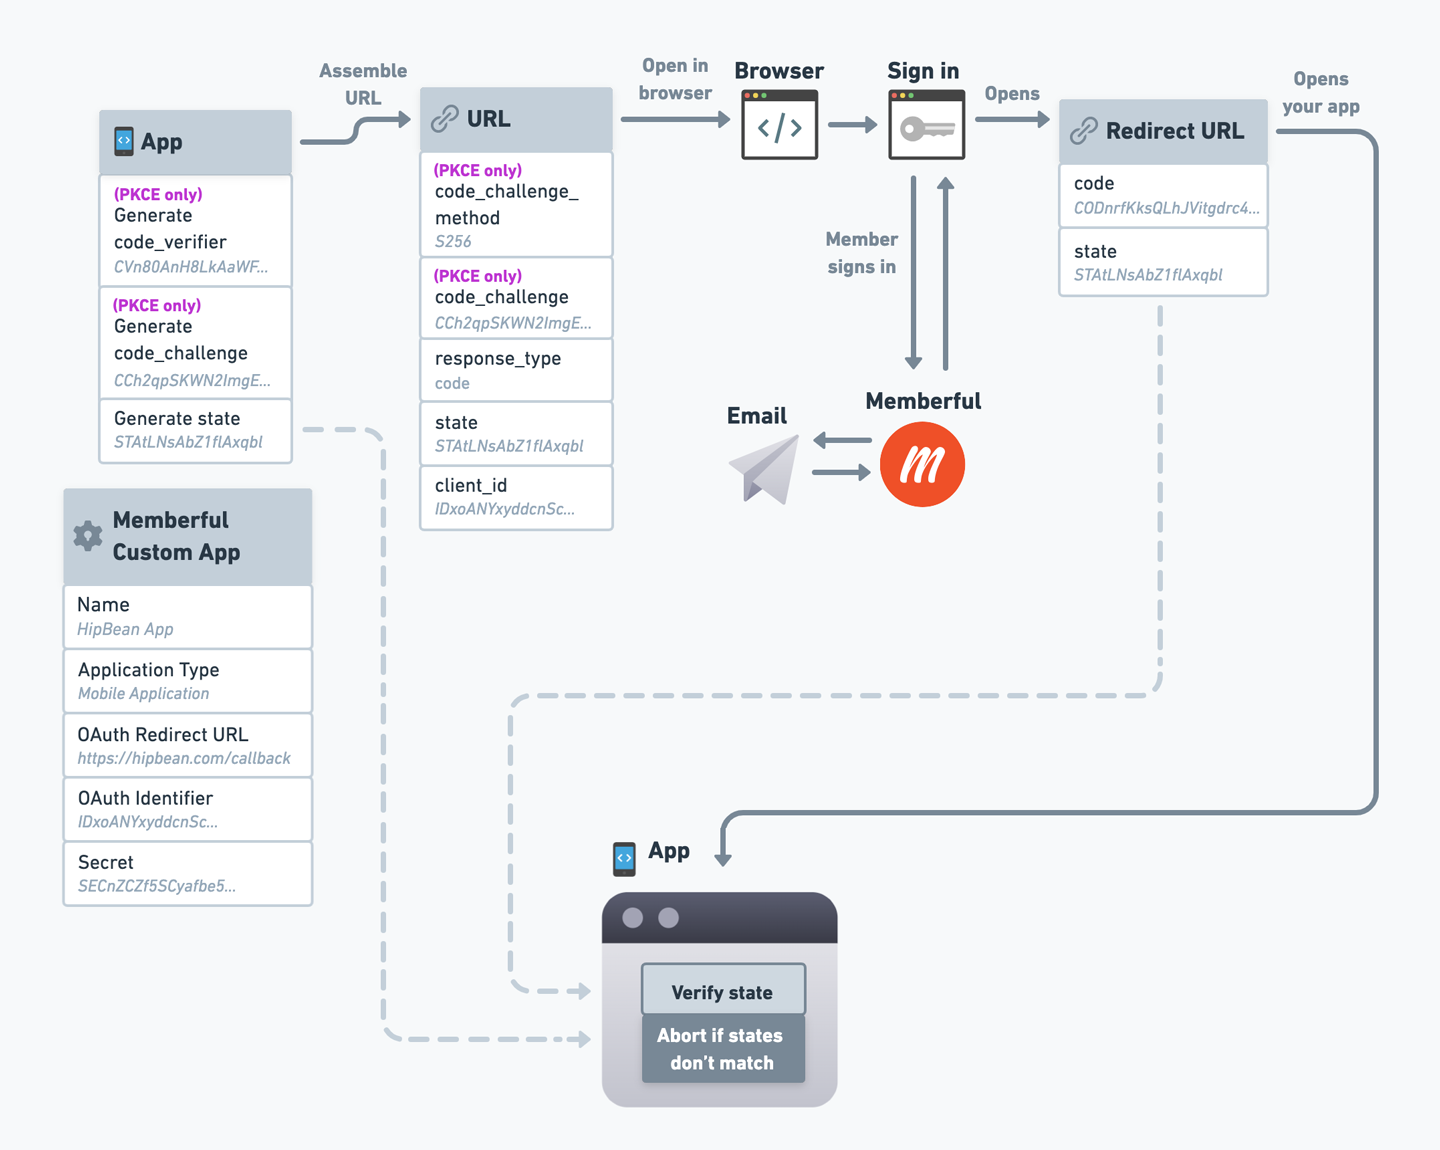
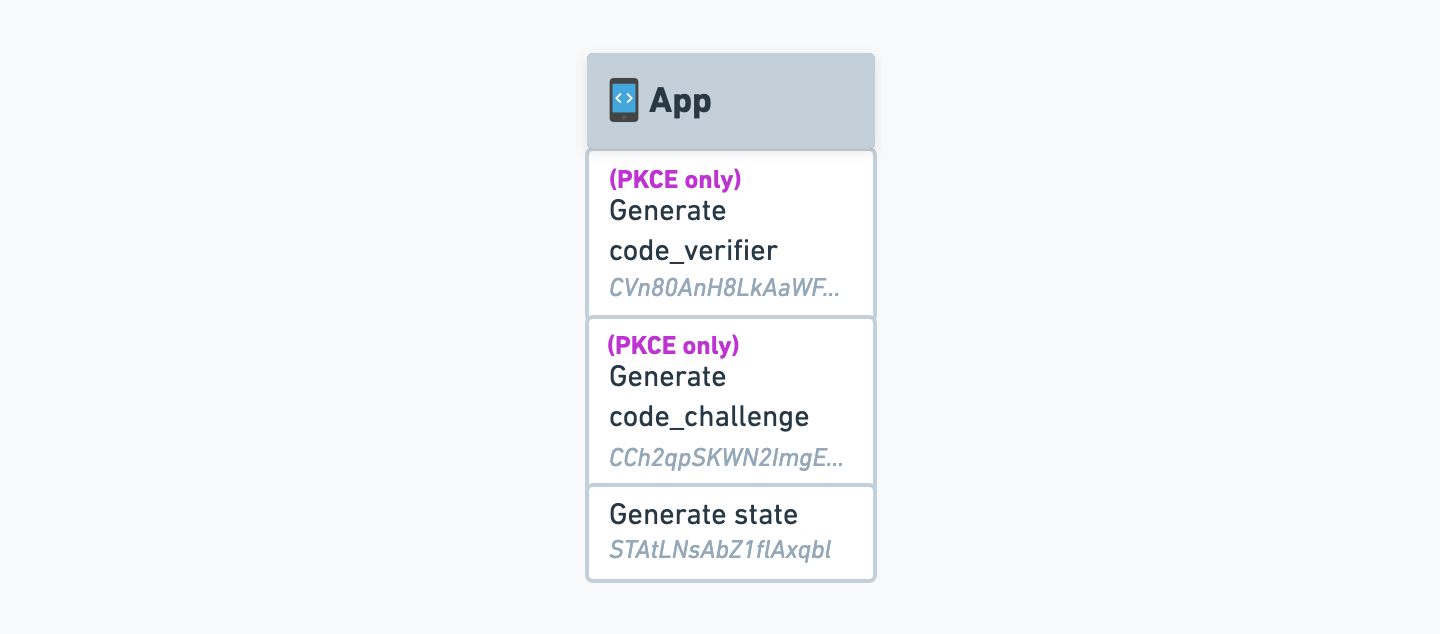 ### Generate the state
The first thing we'll need to do is generate a `state` code. This code will be used to verify that the user is coming from Memberful and not from a third party.
The `state` code can be any random string. There is no specific length requirement, but it's best to make it somewhat long and to use a cryptographically secure random string generator to ensure that it's not guessable.
### Generate the code verifier and code challenge **(PKCE only)**
For single-page and mobile applications, we'll need to generate a `code_verifier` and `code_challenge` code, which are part of the Proof Key of Code Exchange (PKCE) process.
If you prefer not to generate and manage these codes manually, you can make use of an [OAuth 2.0 library](https://oauth.net/code/) to automate that part of the process. We've included an example repository that follows this approach at the bottom of this article.
Keep in mind, though, that these libraries often introduce more complexity than is needed for a project like this, and you'll have to navigate the library's documentation to implement anything that falls outside the scope of this article.
The code verifier must be a secure random string between 43 and 128 characters long. If your app can generate a SHA256 hash, the code challenge should be a Base64-URL encoded SHA256 hash of the code verifier. If not, the code verifier may be used as the challenge (although we highly recommend SHA256 if possible).
Base64 and Base64-URL are different standards. If you use regular Base64 encoding, you'll frequently run into fatal errors that are not very descriptive. Make sure you use Base64-URL encoding to avoid these issues.
Example pseudo code for generating code challenge:
```text theme={null}
code_verifier = generate_random_string(128)
sha256_hash = sha256(code_verifier)
code_challenge = base64url_encode(sha256_hash)
```
Your application must store the code verifier and the state to use them in later stages of the process.
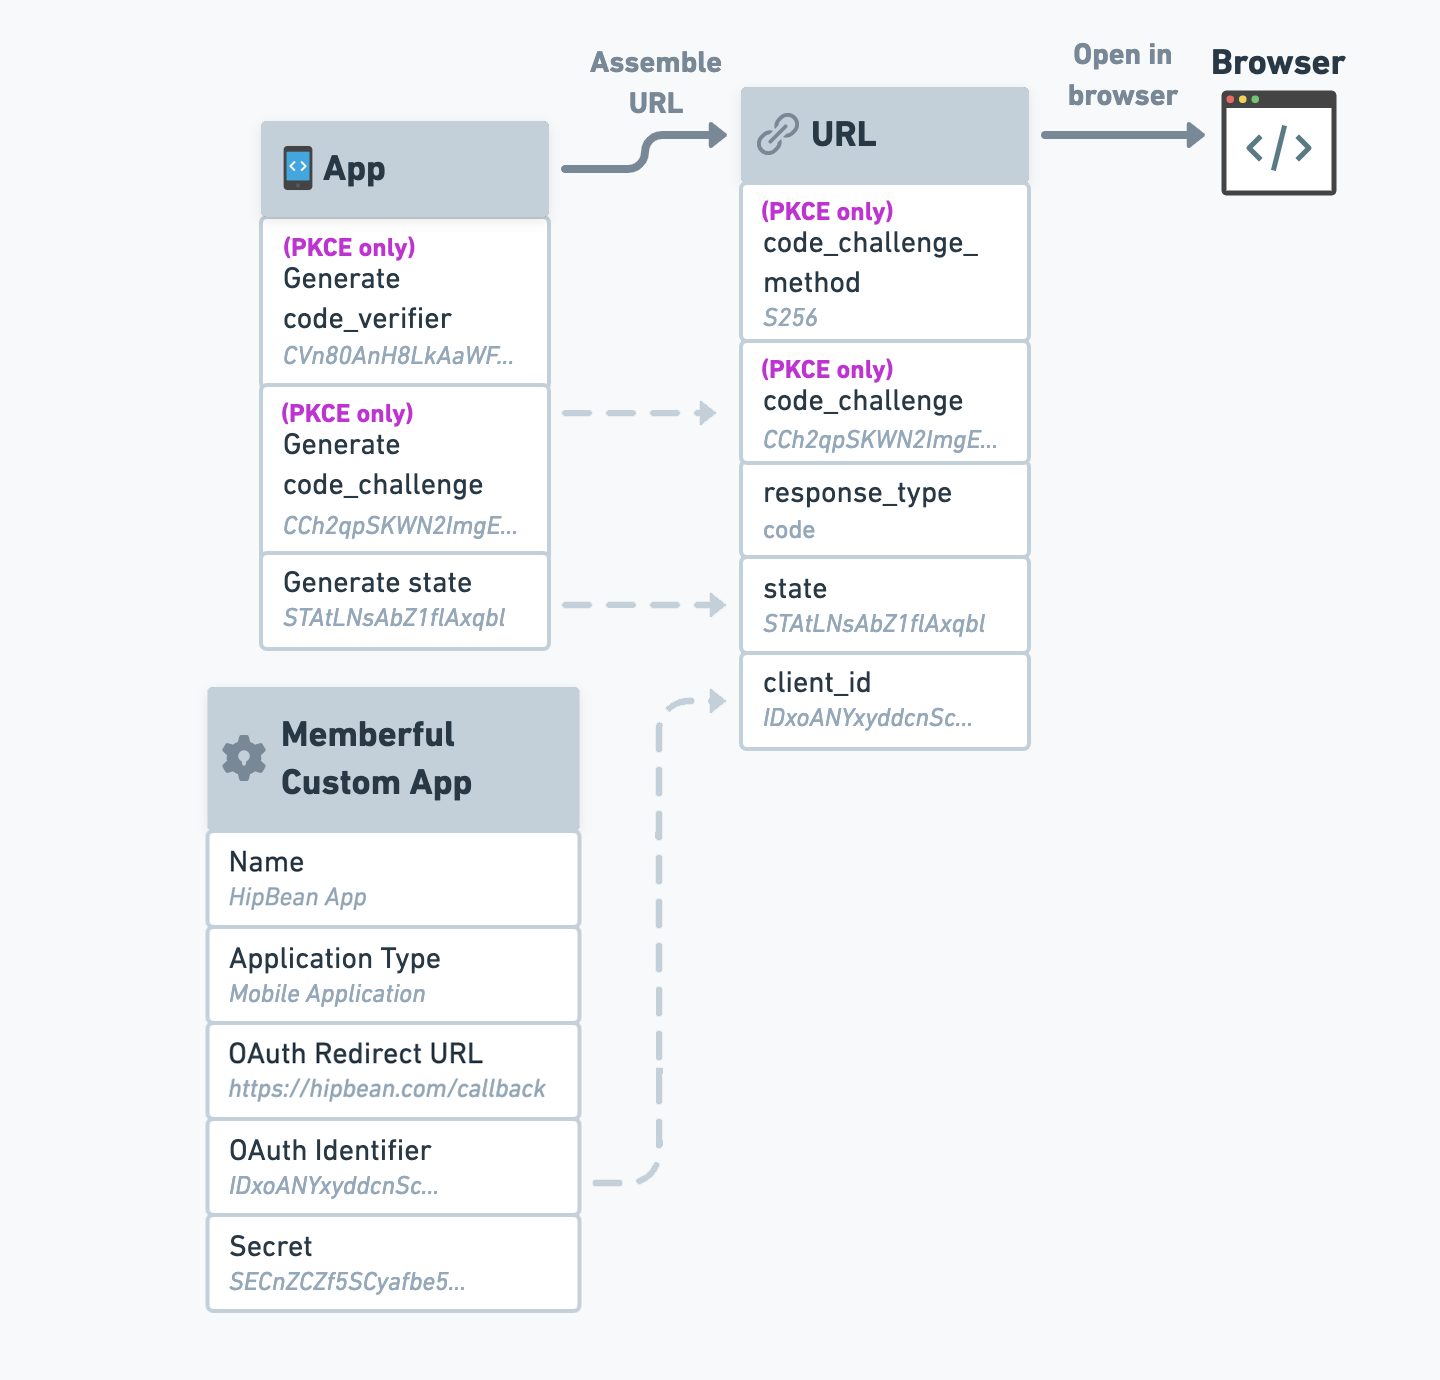
## Request an authorization code
Now that we have the necessary codes, we can request an authorization code from Memberful.
We'll start by assembling a URL with all the required parameters, and then we'll open it in the browser.
### Generate the state
The first thing we'll need to do is generate a `state` code. This code will be used to verify that the user is coming from Memberful and not from a third party.
The `state` code can be any random string. There is no specific length requirement, but it's best to make it somewhat long and to use a cryptographically secure random string generator to ensure that it's not guessable.
### Generate the code verifier and code challenge **(PKCE only)**
For single-page and mobile applications, we'll need to generate a `code_verifier` and `code_challenge` code, which are part of the Proof Key of Code Exchange (PKCE) process.
If you prefer not to generate and manage these codes manually, you can make use of an [OAuth 2.0 library](https://oauth.net/code/) to automate that part of the process. We've included an example repository that follows this approach at the bottom of this article.
Keep in mind, though, that these libraries often introduce more complexity than is needed for a project like this, and you'll have to navigate the library's documentation to implement anything that falls outside the scope of this article.
The code verifier must be a secure random string between 43 and 128 characters long. If your app can generate a SHA256 hash, the code challenge should be a Base64-URL encoded SHA256 hash of the code verifier. If not, the code verifier may be used as the challenge (although we highly recommend SHA256 if possible).
Base64 and Base64-URL are different standards. If you use regular Base64 encoding, you'll frequently run into fatal errors that are not very descriptive. Make sure you use Base64-URL encoding to avoid these issues.
Example pseudo code for generating code challenge:
```text theme={null}
code_verifier = generate_random_string(128)
sha256_hash = sha256(code_verifier)
code_challenge = base64url_encode(sha256_hash)
```
Your application must store the code verifier and the state to use them in later stages of the process.
## Request an authorization code
Now that we have the necessary codes, we can request an authorization code from Memberful.
We'll start by assembling a URL with all the required parameters, and then we'll open it in the browser.
 If you open this as a `POST` request instead of opening it in a browser, an error message will be returned.
We'll start with the base of the URL, which is your Memberful account's OAuth endpoint:
```text theme={null}
https://ACCOUNT-URL.memberful.com/oauth
```
Next, we'll add the following parameters to that URL:
This exact string: `"code"`.
The state code we generated earlier.
Your custom app's OAuth Identifier, found in the Memberful dashboard (*Settings → Custom applications*).
**(PKCE only)** - The code challenge we generated earlier.
**(PKCE only)** - The string `"S256"` if SHA256 was used (recommended), or `"plain"` if the code verifier was used directly.
Our OAuth 2.0 endpoint doesn't require scope. Therefore you can provide any scope, but it will be ignored.
Memberful will prompt the member to enter their email in the browser to sign in. Once they're signed in, Memberful will call the redirect URL provided when you created the custom application, which should point to the "callback" endpoint you created earlier in your app (unless you've [set up a custom sign in / out app](#automatic-sign-in-and-sign-out)).
If you open this as a `POST` request instead of opening it in a browser, an error message will be returned.
We'll start with the base of the URL, which is your Memberful account's OAuth endpoint:
```text theme={null}
https://ACCOUNT-URL.memberful.com/oauth
```
Next, we'll add the following parameters to that URL:
This exact string: `"code"`.
The state code we generated earlier.
Your custom app's OAuth Identifier, found in the Memberful dashboard (*Settings → Custom applications*).
**(PKCE only)** - The code challenge we generated earlier.
**(PKCE only)** - The string `"S256"` if SHA256 was used (recommended), or `"plain"` if the code verifier was used directly.
Our OAuth 2.0 endpoint doesn't require scope. Therefore you can provide any scope, but it will be ignored.
Memberful will prompt the member to enter their email in the browser to sign in. Once they're signed in, Memberful will call the redirect URL provided when you created the custom application, which should point to the "callback" endpoint you created earlier in your app (unless you've [set up a custom sign in / out app](#automatic-sign-in-and-sign-out)).
 The redirect URL will also include the `state` code we generated earlier, and a new `code` parameter, which stands for "authorization code". For example:
```text theme={null}
https://example.com/oauth_callback_endpoint?code=[CODE]&state=[STATE]
```
Authorization codes are only valid for 1 minute and can only be used once.
## Request an access token
When your app receives the redirect, it must extract the `code` and `state` parameters from the URI and verify that the state parameter matches the state you generated earlier.
If you plan to enable Automatic sign in and sign out, you should skip this check, as it's not possible to perform state verification when automatic sign in and sign out is enabled.
If the states don't match, abandon the process and display an error message, as this request doesn't seem to have originated from Memberful.
The redirect URL will also include the `state` code we generated earlier, and a new `code` parameter, which stands for "authorization code". For example:
```text theme={null}
https://example.com/oauth_callback_endpoint?code=[CODE]&state=[STATE]
```
Authorization codes are only valid for 1 minute and can only be used once.
## Request an access token
When your app receives the redirect, it must extract the `code` and `state` parameters from the URI and verify that the state parameter matches the state you generated earlier.
If you plan to enable Automatic sign in and sign out, you should skip this check, as it's not possible to perform state verification when automatic sign in and sign out is enabled.
If the states don't match, abandon the process and display an error message, as this request doesn't seem to have originated from Memberful.
 Once the state has been verified, your app can request an access token from Memberful.
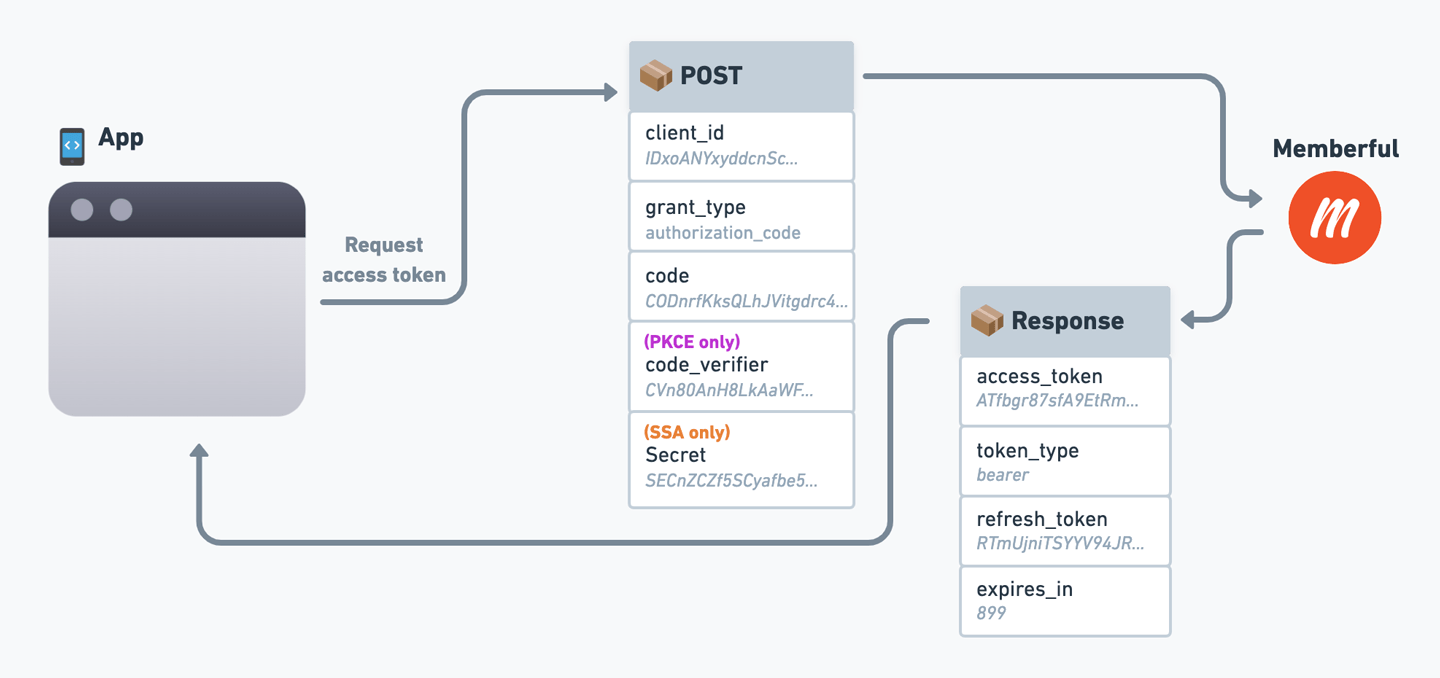 To obtain an access token, send a `POST` request to:
```text theme={null}
https://ACCOUNT-URL.memberful.com/oauth/token
```
The request must include these parameters:
Your custom app's client ID.
This exact string: `"authorization_code"`.
The authorization `code` you just received as a parameter in the redirect.
**(PKCE only)** - The code verifier you generated earlier.
**(SSA only)** - Your custom app's client secret.
In response, Memberful will return an access token and a few other data points. Here's an example response:
```json Example response theme={null}
{
"access_token": "4VMouHo65fi2QTauJeXfWbbz",
"token_type": "bearer",
"expires_in": 900,
"refresh_token": "pwraAdUfmr46JhGt2aJHcuif"
}
```
## Query member data from our API
Once your application has an access token, it can request data from Memberful's GraphQL API to retrieve information about the member.
To obtain an access token, send a `POST` request to:
```text theme={null}
https://ACCOUNT-URL.memberful.com/oauth/token
```
The request must include these parameters:
Your custom app's client ID.
This exact string: `"authorization_code"`.
The authorization `code` you just received as a parameter in the redirect.
**(PKCE only)** - The code verifier you generated earlier.
**(SSA only)** - Your custom app's client secret.
In response, Memberful will return an access token and a few other data points. Here's an example response:
```json Example response theme={null}
{
"access_token": "4VMouHo65fi2QTauJeXfWbbz",
"token_type": "bearer",
"expires_in": 900,
"refresh_token": "pwraAdUfmr46JhGt2aJHcuif"
}
```
## Query member data from our API
Once your application has an access token, it can request data from Memberful's GraphQL API to retrieve information about the member.
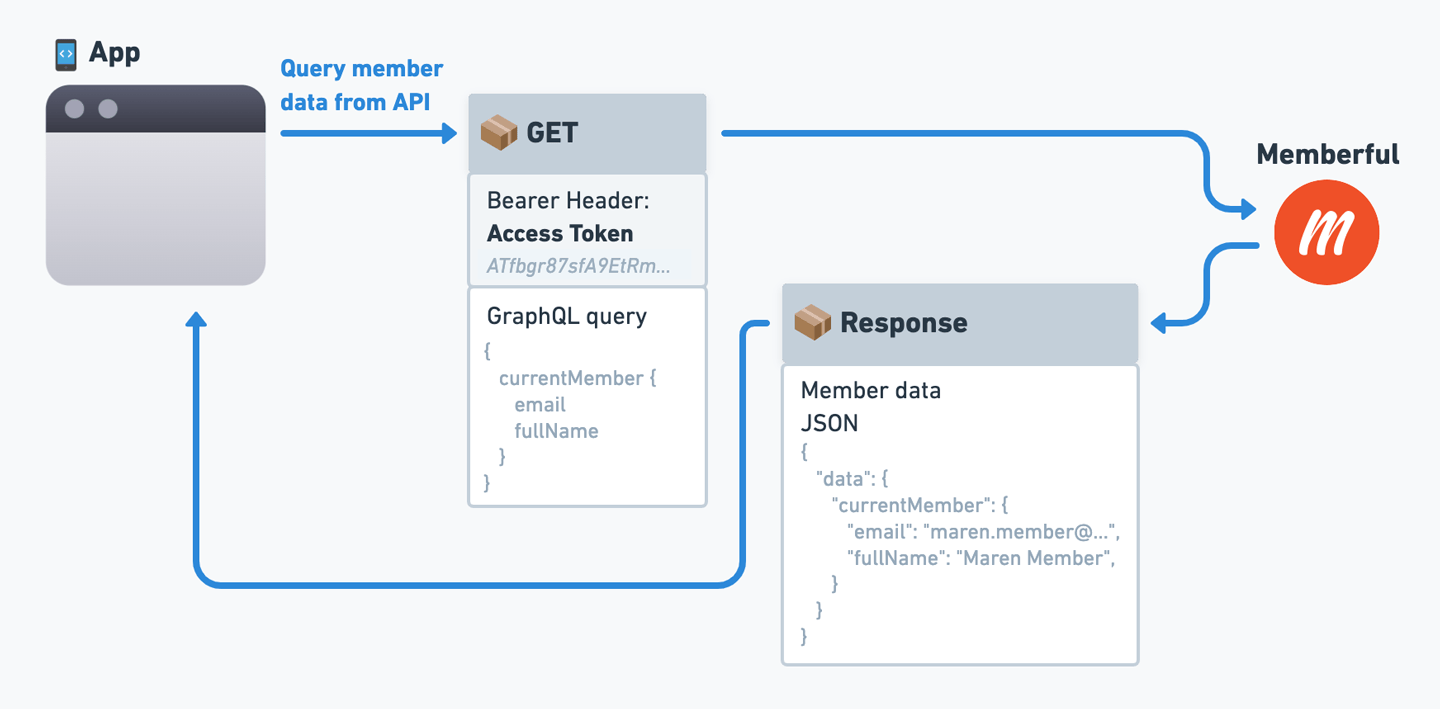 Keep in mind that this should be a `GET` Request, not POST.
```text Endpoint URL theme={null}
https://ACCOUNT-URL.memberful.com/api/graphql/member?query=YOUR_GRAPHQL_QUERY
```
***
```text Authorization header theme={null}
Authorization: Bearer
```
This GraphQL endpoint has a single field called `currentMember` with GraphQL type `Member`. You have to specify what information you need in the `query` parameter.
```graphql Example query theme={null}
{
currentMember {
address {
city
street
postalCode
country
}
creditCard {
expMonth
expYear
}
downloads {
id
name
}
email
fullName
id
phoneNumber
subscriptions {
active
expiresAt
pass {
id
name
}
plan {
id
label
}
}
unrestrictedAccess
}
}
```
```json Example response theme={null}
{
"data": {
"currentMember": {
"address": {
"city": null,
"street": null,
"postalCode": null,
"country": null
},
"creditCard": {
"expMonth": 10,
"expYear": 2020
},
"downloads": [
{
"id": "1",
"name": "A download"
}
],
"email": "john.doe@example.com",
"fullName": "John Doe",
"id": "1",
"phoneNumber": null,
"subscriptions": [
{
"active": true,
"expiresAt": 1528625190,
"pass": {
"id": "10",
"name": "Premium"
},
"plan": {
"id": "1",
"label": "$10/month"
}
}
],
"unrestrictedAccess": false
}
}
}
```
See the [API explorer](/api-reference/memberful-api/#using-the-graphql-api-explorer) to learn more about the available GraphQL types.
### Refresh the access token
Access tokens are valid for 15 minutes. You can use a refresh token (provided with each access token) to get a new access token. Refresh tokens are valid for one year.
Keep in mind that this should be a `GET` Request, not POST.
```text Endpoint URL theme={null}
https://ACCOUNT-URL.memberful.com/api/graphql/member?query=YOUR_GRAPHQL_QUERY
```
***
```text Authorization header theme={null}
Authorization: Bearer
```
This GraphQL endpoint has a single field called `currentMember` with GraphQL type `Member`. You have to specify what information you need in the `query` parameter.
```graphql Example query theme={null}
{
currentMember {
address {
city
street
postalCode
country
}
creditCard {
expMonth
expYear
}
downloads {
id
name
}
email
fullName
id
phoneNumber
subscriptions {
active
expiresAt
pass {
id
name
}
plan {
id
label
}
}
unrestrictedAccess
}
}
```
```json Example response theme={null}
{
"data": {
"currentMember": {
"address": {
"city": null,
"street": null,
"postalCode": null,
"country": null
},
"creditCard": {
"expMonth": 10,
"expYear": 2020
},
"downloads": [
{
"id": "1",
"name": "A download"
}
],
"email": "john.doe@example.com",
"fullName": "John Doe",
"id": "1",
"phoneNumber": null,
"subscriptions": [
{
"active": true,
"expiresAt": 1528625190,
"pass": {
"id": "10",
"name": "Premium"
},
"plan": {
"id": "1",
"label": "$10/month"
}
}
],
"unrestrictedAccess": false
}
}
}
```
See the [API explorer](/api-reference/memberful-api/#using-the-graphql-api-explorer) to learn more about the available GraphQL types.
### Refresh the access token
Access tokens are valid for 15 minutes. You can use a refresh token (provided with each access token) to get a new access token. Refresh tokens are valid for one year.
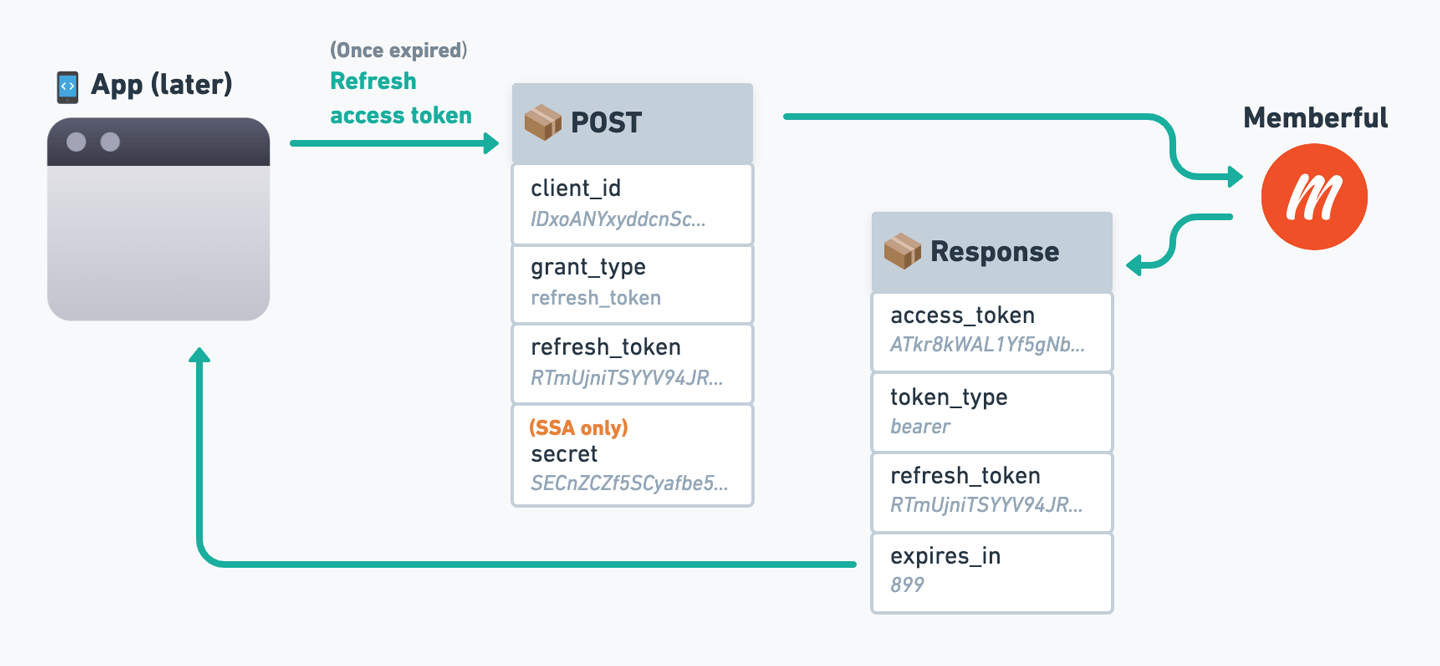 To obtain a new access token, send a `POST` request to:
```text theme={null}
https://ACCOUNT-URL.memberful.com/oauth/token
```
The request must include these parameters:
This exact string: `"refresh_token"`.
Your custom app's client ID.
The refresh token received with an access token.
**(SSA only)** - Your custom app's client secret.
In response, Memberful will return an access token.
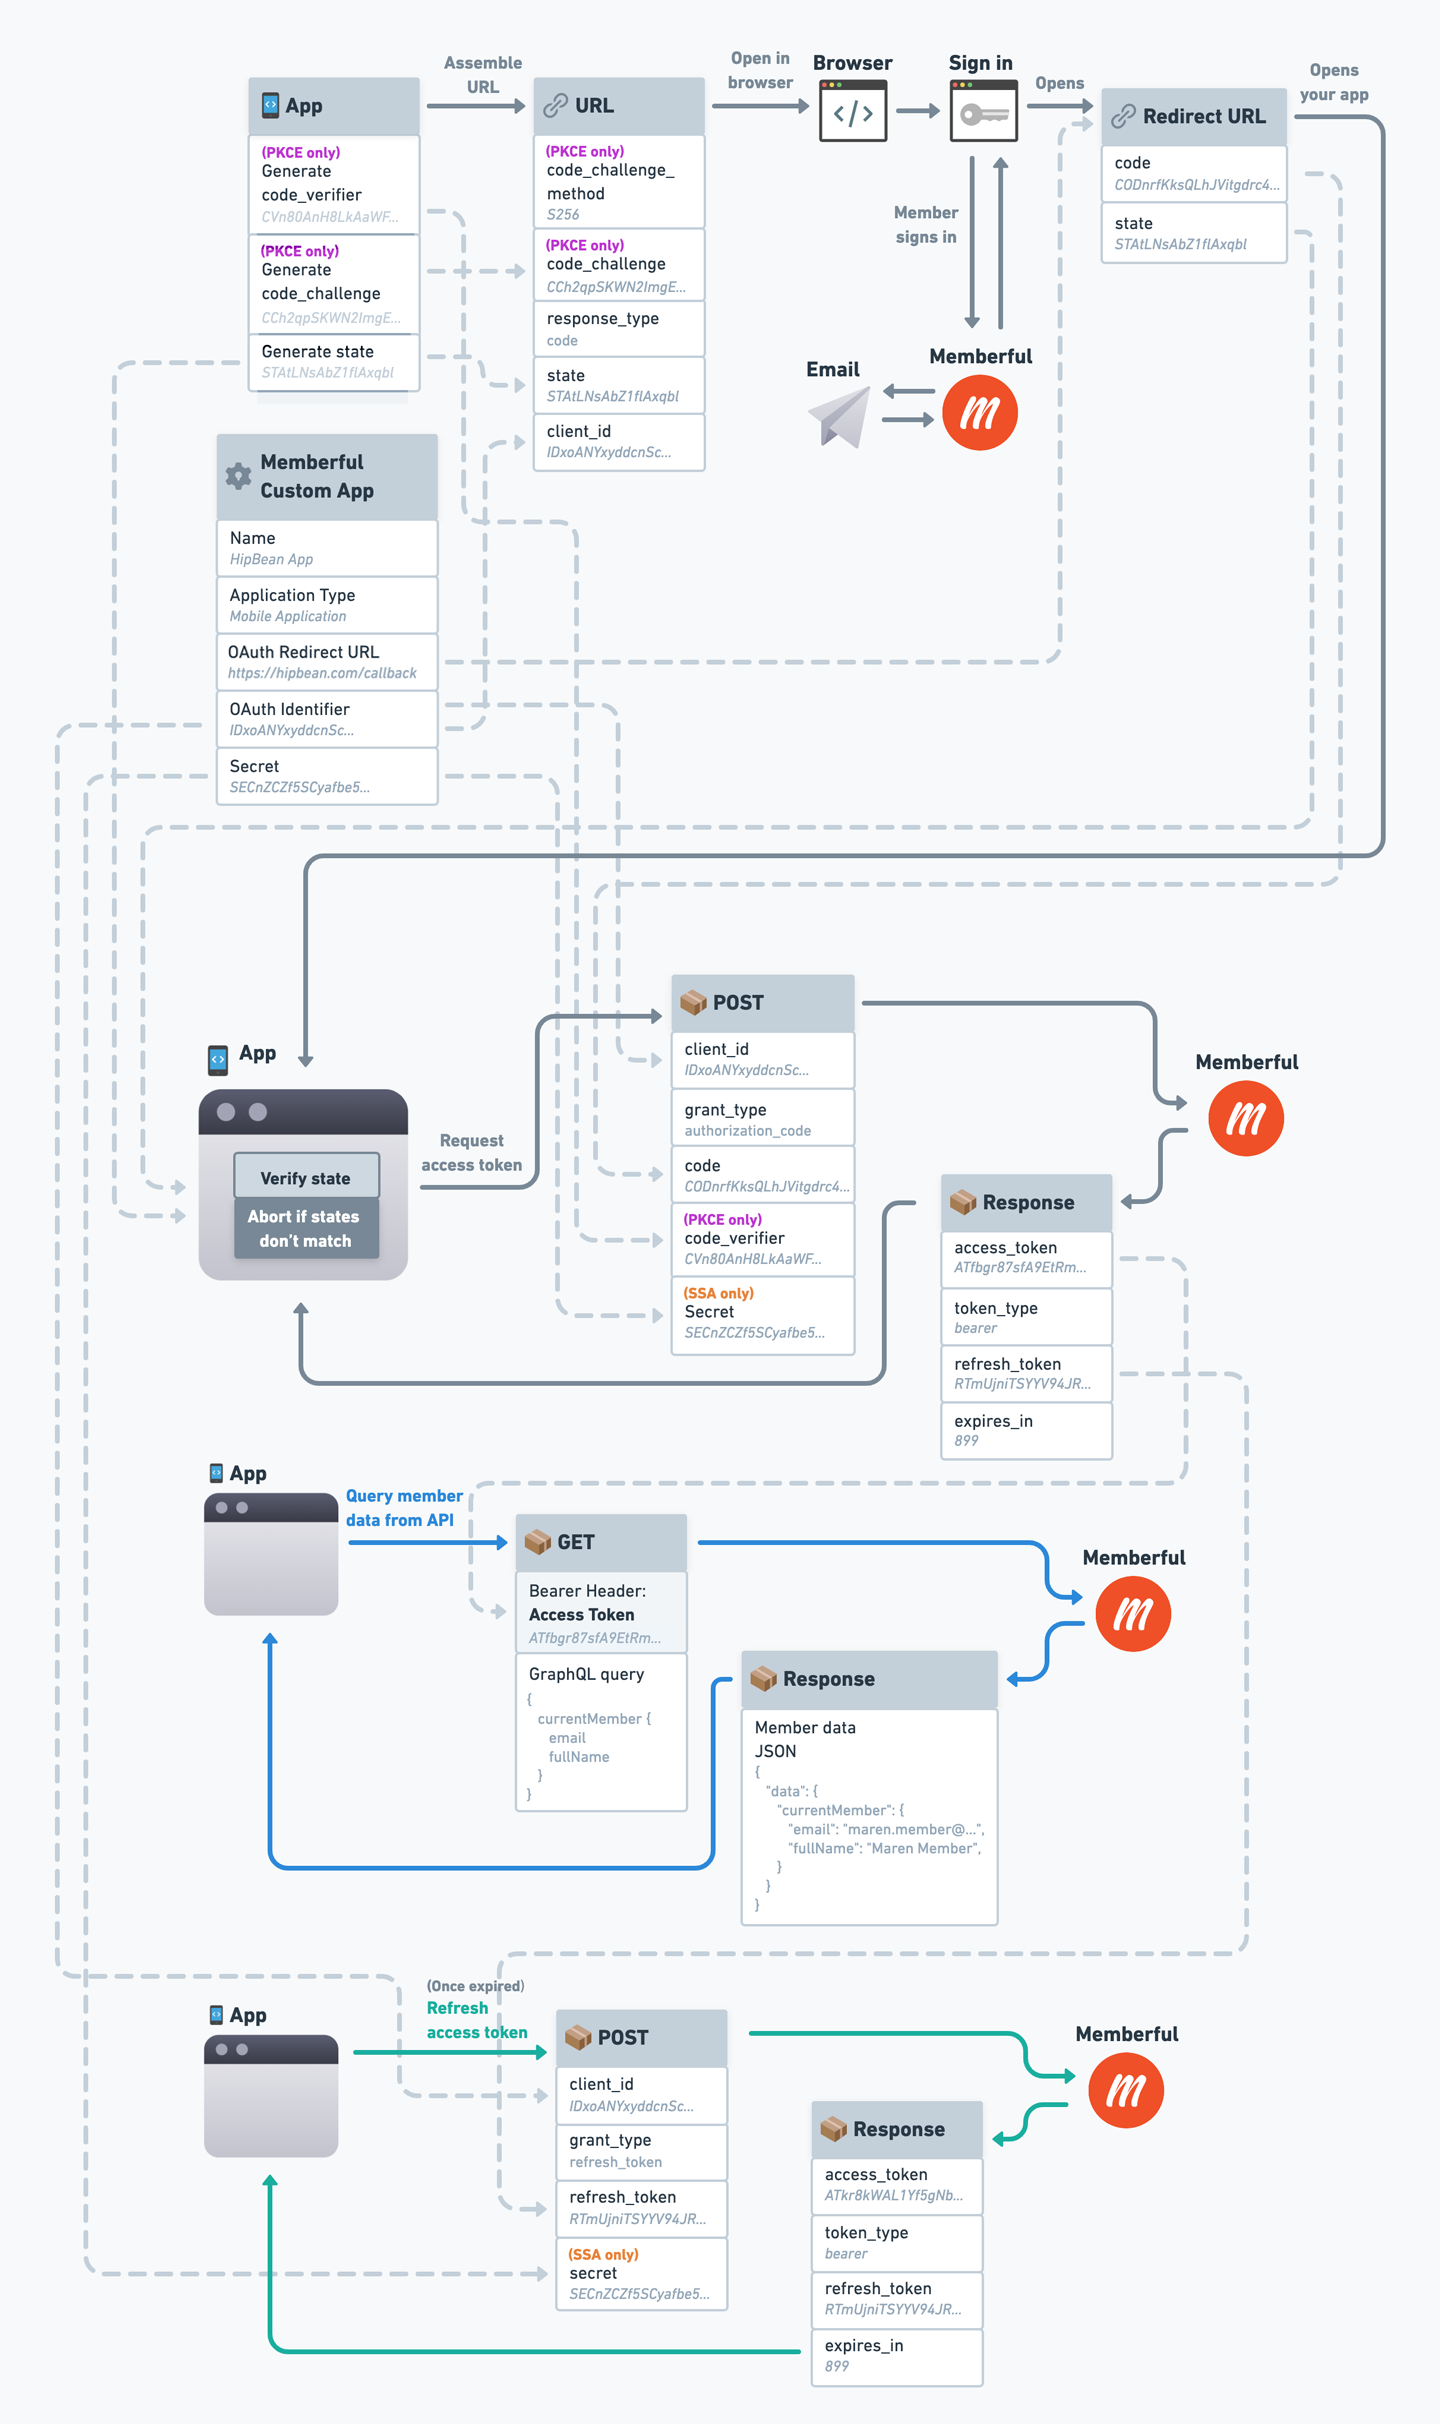
## OAuth flow reference diagram
We've created a reference diagram to help you visualize the entire OAuth flow, including where each parameter comes from. Click the image to open it in full size.
To obtain a new access token, send a `POST` request to:
```text theme={null}
https://ACCOUNT-URL.memberful.com/oauth/token
```
The request must include these parameters:
This exact string: `"refresh_token"`.
Your custom app's client ID.
The refresh token received with an access token.
**(SSA only)** - Your custom app's client secret.
In response, Memberful will return an access token.
## OAuth flow reference diagram
We've created a reference diagram to help you visualize the entire OAuth flow, including where each parameter comes from. Click the image to open it in full size.
 ## Code examples
We've created a few code examples to help you get started with OAuth. These examples are written in NodeJS and Express, but you can use them as a reference for any language or framework.
* [Server-side application (SSA).](https://github.com/memberful/memberful-oauth-ssa-example_nodejs-express)
* [Server-side application (SSA) using an Auth library.](https://github.com/memberful/memberful-oauth-ssa-example_nodejs-express-passport)
* [Client-side application (PKCE).](https://github.com/memberful/memberful-oauth-pkce-example_nodejs-express)
* [Client-side application (PKCE) using an Auth library.](https://github.com/memberful/memberful-oauth-pkce-example_nodejs-express-passport)
## Automatic sign in and sign out
You can set your OAuth application as your login application (*Settings → Custom applications → Automatic login*) and we will automatically sign members into your application any time they sign in to Memberful.
It's not possible to perform state verification when automatic sign in and sign out is enabled, so you'll need to remove state verification from the [access token request](#request-an-access-token) stage of your OAuth flow. In Memberful's case, we believe the possible risks that stem from this are relatively small, but make sure you're able to accept this tradeoff.
This option will only show up if you've configured a custom app with OAuth and you aren't using our WordPress plugin, since WordPress becomes your login application automatically when you've enabled the plugin.
If you've set up automatic login for a custom app (let's call this *App A*) and a sign-in is initiated through a *different* OAuth application (we'll call this *App B*), Memberful will ignore *App B*'s Redirect URL, and instead redirect to *App A*'s Redirect URL, because it's the default login application. However, Memberful will append a `redirect_to` query parameter to the URL so that *App A* can redirect to the desired URL after signing in.
### Sign out
When a member signs out from Memberful and you've set up an application for automatic sign in / out as described above, we automatically redirect the member to that application's redirect URL with an additional parameter of `action` set to `logout`. Your application can use this to detect the logout action, then sign the member out and redirect them back to the sign-in form or some other page of your choosing.
## Code examples
We've created a few code examples to help you get started with OAuth. These examples are written in NodeJS and Express, but you can use them as a reference for any language or framework.
* [Server-side application (SSA).](https://github.com/memberful/memberful-oauth-ssa-example_nodejs-express)
* [Server-side application (SSA) using an Auth library.](https://github.com/memberful/memberful-oauth-ssa-example_nodejs-express-passport)
* [Client-side application (PKCE).](https://github.com/memberful/memberful-oauth-pkce-example_nodejs-express)
* [Client-side application (PKCE) using an Auth library.](https://github.com/memberful/memberful-oauth-pkce-example_nodejs-express-passport)
## Automatic sign in and sign out
You can set your OAuth application as your login application (*Settings → Custom applications → Automatic login*) and we will automatically sign members into your application any time they sign in to Memberful.
It's not possible to perform state verification when automatic sign in and sign out is enabled, so you'll need to remove state verification from the [access token request](#request-an-access-token) stage of your OAuth flow. In Memberful's case, we believe the possible risks that stem from this are relatively small, but make sure you're able to accept this tradeoff.
This option will only show up if you've configured a custom app with OAuth and you aren't using our WordPress plugin, since WordPress becomes your login application automatically when you've enabled the plugin.
If you've set up automatic login for a custom app (let's call this *App A*) and a sign-in is initiated through a *different* OAuth application (we'll call this *App B*), Memberful will ignore *App B*'s Redirect URL, and instead redirect to *App A*'s Redirect URL, because it's the default login application. However, Memberful will append a `redirect_to` query parameter to the URL so that *App A* can redirect to the desired URL after signing in.
### Sign out
When a member signs out from Memberful and you've set up an application for automatic sign in / out as described above, we automatically redirect the member to that application's redirect URL with an additional parameter of `action` set to `logout`. Your application can use this to detect the logout action, then sign the member out and redirect them back to the sign-in form or some other page of your choosing.